The concept of portals, or a means to transport template HTML to various regions of the DOM inside an app, is one of the new features of Vue 3 that has been in the making for a while.
The portal-vuelibrary in Vue2 allowed users to create portals, a React functionality that is frequently used. But there was no native functionality that allowed us to do the same right out of the box.
Now, with the help of the Vue 3 Teleport functionality, this option is now natively supported in the latest version of this front end framework.
In this article, we’ll go over how to use Teleport in Vue 3. We’ll also discuss what’s the main objective of this functionality, and we’ll show you a real life example so you have a better grasp on its use.
Let’s get started!
What is Teleport and why should we use it?
We must first comprehend when and why this Teleport function might be useful.
It becomes crucial to logically structure your source code when working on larger Vue projects. However, when we’re working with some particular elements like modals, the logic for the template will sometimes be located in a different file, and not in the same one as where our component itself is located.
In fact, managing these elements is frequently made much simpler when they are handled fully independently of our Vue app’s DOM. All because managing the scope of each parent can make it difficult to handle the positioning and style of child components.
The Teleport feature is useful in this situation. We can leverage a component’s data or props by writing Template code in the component where the logic is placed. But after that, we place our code completely beyond the purview of our Vue app.
To transfer the functionality from a child component up the DOM Tree without utilizing Teleport, we would have to be concerned about event propagation, which can be quite a difficult topic to grasp. But now, thanks to Vue 3’s Teleport feature, this has been made much easier.
Let’s examine a case where we might want to use this functionality.
An example of Vue 3’s Teleport feature
Let’s start by imagining we want to cause a notification to appear on a child component when our user clicks a button. It’s easier, as we just discussed, to render this alert (which will take the form of a modal) in a completely different DOM tree than the root #app element created by Vue.
In order to get started, we’d first head over to our index.html file and insert a div just before the closing body tag, like this:
<body>
    <div id="app"></div>
    <div id="teleport-target"></div>
    <script type="module" src="/src/main.js"></script>
</body>
Let’s now begin developing the component that causes the notification to appear in our browser. Do not miss this Vue 3 introduction if you are not very familiar with this framework!
This code sample renders a notification for two seconds when the button is pressed. However, the main objective of Teleport is to render the notification outside of our Vue app.
<template>
  <div class="teleport">
    <button @click="showModal">Trigger Modal!</button>
    <teleport to="#teleport-target" v-if="isOpen">
      <div class="notification">
        This is rendering outside of this child component!
      </div>
    </teleport>
  </div>
</template>

<script setup>
import { ref } from "vue";
const isOpen = ref(false);

let closeModal;

const showModal = () => {
  isOpen.value = true;

  clearTimeout(closeModal);

  closePopup = setTimeout(() => {
    isOpen.value = false;
  }, 2000);
};
</script>

<style scoped>
.notification {
  position: fixed;
  background-color: red;
  color: white;
  bottom: 20px;
  left: 20px;
  width: 350px;
  padding: 20px;
}
</style>
As you can see, the only attribute that Teleport requires is “to”.
The valid DOM query string that the “to” attribute accepts can be any of the following: an element’s id, class, or data selector, along with a responsive query string.
Our Vue app will now find the #teleport-target div we added to our index.html because we passed it in, and it will include all our code and show it in that div.
This is the outcome we should get when we press the button:
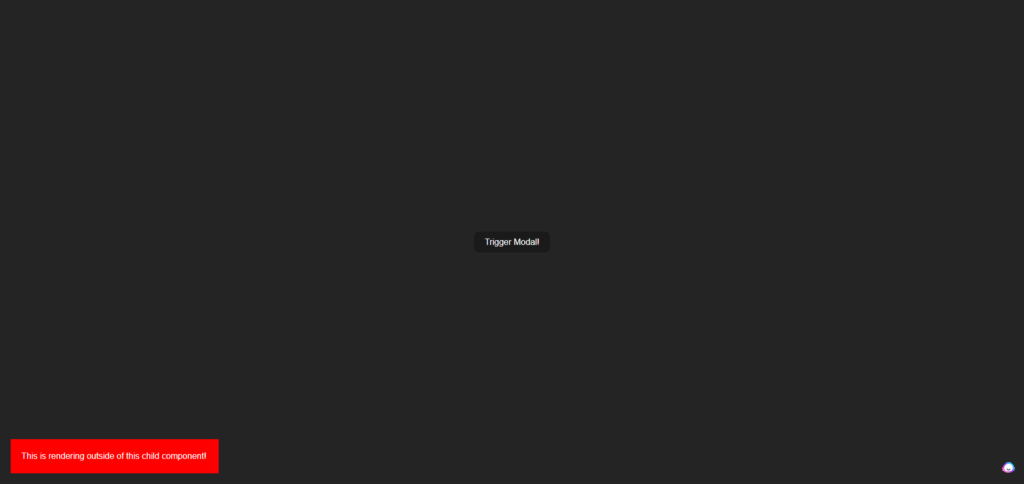
What’s going on is fairly obvious when looking at the DOM and inspecting the elements. In essence, we are able to utilize the entire functionality of our VueTeleports component while instructing our project to render that template code elsewhere!
Final thoughts
That concludes our little introduction to Vue Teleport. This should be a wonderful starting point for using this fascinating feature, but let us know if you need any more guidance in the comments below!
💬 Leave a comment