
onDrag allows you to execute a function when a user drags a component. It is passed as a JSX attribute.
onDrag Use Cases
As its name suggests, onDrag fires whenever a React component is being dragged. This can be useful in web apps that require drag-and-drop functionality, for example the famous work management app Trello.
Passing onDrag in JSX as an attribute:
function handleDrag() {
    console.log("Dragging...")
}

return (
    <div draggable onDrag={handleDrag}>
        Hello World
    </div>
)
React onDrag vs onDragStart
onDrag fires continuously while the element is being dragged by the user, while onDragStart only fires once, when the user first drags an element.
onDragStart is good for drag-and-drop applications where there is only a single event occurring, for example a simple data transfer between React components. onDrag is better when you need to continuously know when an element is being dragged, and act accordingly.
Here’s an example to illustrate this:
function DragComponent() {

    function handleDrag() {
        console.log("Dragging...")
    }

    return (
        <div draggable onDrag={handleDrag}>
            Hello World
        </div>
    )
}

export { DragComponent }
When dragged, the above component generates the following output in the console:

As soon as the component is dragged, output starts continuously streaming to the console. On the contrary, if we switch the attribute to onDragStart:
function DragComponent() {

  function handleDrag() {
    console.log("Dragging...")
  }

  return (
    <div>
      Hello World
    </div>
  )
}

export { DragComponent }
The output to the console is only a single line:

Thus, onDrag continuously calls its corresponding function, while onDragStart only does so once.
Important note: notice how we set the draggable attribute in the JSX elements above. We need to do this in order for onDrag to be fired in the first place!
Example: Constantly Updating Element when Dragged
Sometimes, we’d like to constantly get information from an element while it’s being dragged. We need onDrag for this, as we need the information to continuously update.
In the example below, we will continuously print an element’s x and y coordinates while being dragged to the console:
function DragComponent() {

    function handleDrag(e) {
        console.log("X: " + e.clientX + " | Y: " + e.clientY)
    }

    return (
        <div>
            Hello World
        </div>
    )
}

export { DragComponent }
There’s a bit to unpack here. As always with onDrag, we first set the JSX attribute draggable to allow the drag operation.
We then pass our handleDrag function to the onDrag attribute. That way, when our element is dragged by the user, the handleDrag function will be continuously called.
We’ll notice that there is an e added as a parameter into the handleDrag function. This parameter represents the event object that is automatically passed into the function.
The event object that gets passed into the function has several attributes we can call, including clientX and clientY, which are the x and y positions of the event, respectively. In this case, x and y represent the coordinates of the element while the drag operation is taking place.
We print these values to the console, resulting in the output below when the element is dragged:
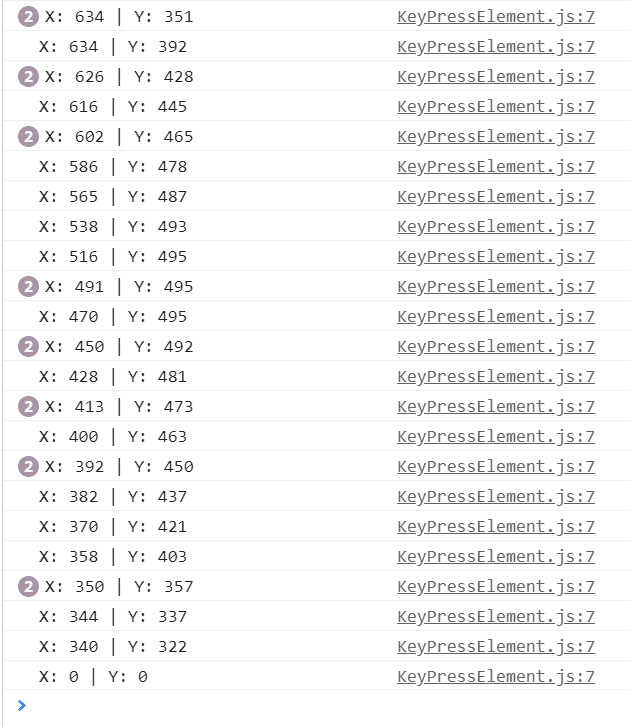
As we can see, the X and Y coordinates constantly update as the element is being dragged.
We’ll also notice that when the drag operation is complete, and the element snaps back to its original position, X and Y both return to 0. This shows that the element, and not the mouse, is generating the values of X and Y.
That’s it for this article! Please leave any questions or comments below.
💬 Leave a comment