Introduction
React is a Component-based library for developing modern User Interfaces. At its core, it exposes a modular and clean approach to building applications through the use of unit-scale Components; a way that’s also known as “Thinking in React“.
In order to be able to “think in React”, we have to understand a couple of key concepts; what Components are, how Components relate to each other, and how Components communicate with each other.
If you are not already familiar with what Components are and how they work in React, I would recommend checking out this article, as it goes in more depth about this concept.
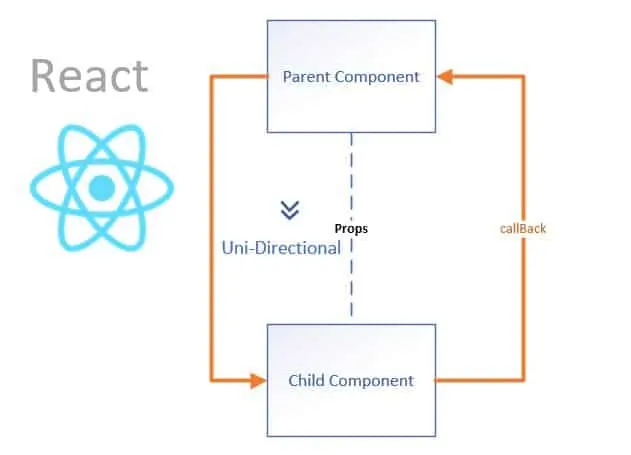
React follows a hierarchical way when it comes to building Components; Components can have children and parents, as well as grandparents and grandchildren. A parent may have many children, but a child may only have one parent.
The relationship is especially important as it highlights the data flow that React uses, which is a uni-directional one; that means that data can only go one way: from the parents to the children, and not the other way around. The data that is being passed down from parents to children comes under the name of Props.
Props Overview
As mentioned earlier, in order to let those Components communicate with each other, we do need to make use of something called Props.
Props, which stand for “properties”, are a way for us to pass down the state from a Parent Component down to a Child Component in order to alter its behavior.
If you are not already familiar with state and state management in React, I highly suggest checking out this article which does a great job of laying out the main concepts and their usage in simple terms.
Think of Props as function parameters. We use parameters to alter the output of a function, which is exactly the same scenario as when we are using Props in React.
Props are also readonly, so we cannot modify them directly; the approach we are using to update the state/Props that we are receiving, is to also pass down a method that, once executed, will mutate the state within the parent and sequentially, update the props passed down to that specific component.
Props Usage
In order to get a better understanding of how we might use and when we should Props we will go over a simple example that will also showcase the Components philosophy that React follows, where Components should be a unit of reusable code (Props are a major player in making that happen).
Let’s say we have a list of hardcoded blog posts that we wish to render to the screen.
Pretty simple, right?
Let’s see what that would look like.
Example
First, we’ll bootstrap our React project in an empty directory using either yarn or npx; I personally prefer yarn, but you can use whichever you wish.
The commands to initialize our React project would:
- yarn:
yarn create react-app - npx:
npx create-react-app
If you do not already have those tools available, you can find installation instructions here and here.
Now that we’ve got ourselves with a brand new React application we may create and render our list of blog posts in the App.js file under the root src/ directory:
import './App.css';

function App() {
  const posts = [
    {
      "userId": 1,
      "id": 1,
      "title": "sunt aut facere repellat provident occaecati excepturi optio reprehenderit",
      "body": "quia et suscipit\nsuscipit recusandae consequuntur expedita et cum\nreprehenderit molestiae ut ut quas totam\nnostrum rerum est autem sunt rem eveniet architecto"
    },
    {
      "userId": 1,
      "id": 2,
      "title": "qui est esse",
      "body": "est rerum tempore vitae\nsequi sint nihil reprehenderit dolor beatae ea dolores neque\nfugiat blanditiis voluptate porro vel nihil molestiae ut reiciendis\nqui aperiam non debitis possimus qui neque nisi nulla"
    },
    {
      "userId": 1,
      "id": 3,
      "title": "ea molestias quasi exercitationem repellat qui ipsa sit aut",
      "body": "et iusto sed quo iure\nvoluptatem occaecati omnis eligendi aut ad\nvoluptatem doloribus vel accusantium quis pariatur\nmolestiae porro eius odio et labore et velit aut"
    },
    {
      "userId": 1,
      "id": 4,
      "title": "eum et est occaecati",
      "body": "ullam et saepe reiciendis voluptatem adipisci\nsit amet autem assumenda provident rerum culpa\nquis hic commodi nesciunt rem tenetur doloremque ipsam iure\nquis sunt voluptatem rerum illo velit"
    },
    {
      "userId": 1,
      "id": 5,
      "title": "nesciunt quas odio",
      "body": "repudiandae veniam quaerat sunt sed\nalias aut fugiat sit autem sed est\nvoluptatem omnis possimus esse voluptatibus quis\nest aut tenetur dolor neque"
    },
  ];

  return (
    <div className="App">
      <h2>Posts</h2>
      <div className="posts-container">
        {posts.map((post) => (
          <div
            className='post'
            key={post.id}
          >
            <h3>{post.title}</h3>
            <p>{post.body}</p>
          </div>
        ))}
      </div>
    </div>
  );
}

export default App;
As you may notice, we’ve defined a hardcoded list of blog articles which we are mapping over and rendering each of the items to the screen.
There are also some styles applied, which have been defined in the src/App.css file:
* {
  margin: 0;
  padding: 0;
}

.App {
  text-align: center;
}

.App h2 {
  font-size: 1.75rem;
  text-align: left;
  margin: 1.25vh 0;
  margin-left: 20vw;
}

.posts-container {
  width: 60vw;
  margin: 0 auto;
}

.post {
  border: 1px solid #e8e8e8;
  text-align: left;
  box-sizing: border-box;
  padding: 1.25rem;
  border-radius: 6px;
}

.post h3 {
  font-size: 1.25rem;
  margin-bottom: 0.75rem;
  font-weight: 700;
}

.post p {
  font-size: 1rem;
  font-weight: 500;
  color: #333;
}

.post:not(:last-of-type) {
  margin-bottom: 2.5vh;
}

.App {
  text-align: center;
}

.App-logo {
  height: 40vmin;
  pointer-events: none;
}

@media (prefers-reduced-motion: no-preference) {
  .App-logo {
    animation: App-logo-spin infinite 20s linear;
  }
}

.App-header {
  background-color: #282c34;
  min-height: 100vh;
  display: flex;
  flex-direction: column;
  align-items: center;
  justify-content: center;
  font-size: calc(10px + 2vmin);
  color: white;
}

.App-link {
  color: #61dafb;
}

@keyframes App-logo-spin {
  from {
    transform: rotate(0deg);
  }
  to {
    transform: rotate(360deg);
  }
}
And the final result would look something like this:
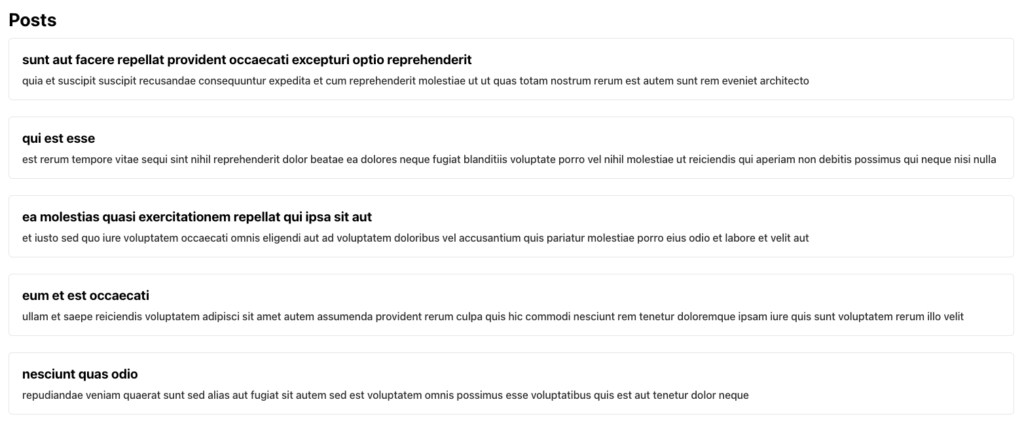
As you can see, everything seems to be working as expected.
However, there might be a better approach to this scenario.
You see, in case we were to add a list of blog posts on another page of our Application, we would have to copy and paste everything over to that view; this is not reusable, nor modular.
What we can do instead is, create a new Post component under src/components/Post/index.js which will contain the template for the post, which can then receive Props for the title and the content of the post. That will ensure that our component is reusable.
import React from 'react'

const Post = (props) => (
  <div
    className='post'
    key={props.id}
  >
    <h3>{props.title}</h3>
    <p>{props.body}</p>
  </div>
);

export default Post;
The Props parameter is an object that will contain the Props that we decide to pass down to the component.
We will always have access to the Props as the first parameter of any React component.
It might look a bit confusing, but once you’ll see how we are going to use the component inside our src/App.js file it’s going to get much clearer:
return (
    <div className="App">
      <h2>Posts</h2>
      <div className="posts-container">
        {posts.map((post) => (
          <Post
            id={post.id}
            title={post.title}
            body={post.body}
          />
        ))}
      </div>
    </div>
  );
And we are importing the Post component like this:
import Post from './components/Post';So, what we are doing here is using the Post component similarly to how we would use a div element for example; the difference, however, is that we are able to pass down props through the properties we have defined in the Post component.
That is represented by the following lines of code:
id={post.id}
title={post.title}
body={post.body}
Where the value of the specific Post article’s id is the value of the post object’s id; same for the title and body. The names of the props do not have to match the names of the properties that we’re passing down as values.
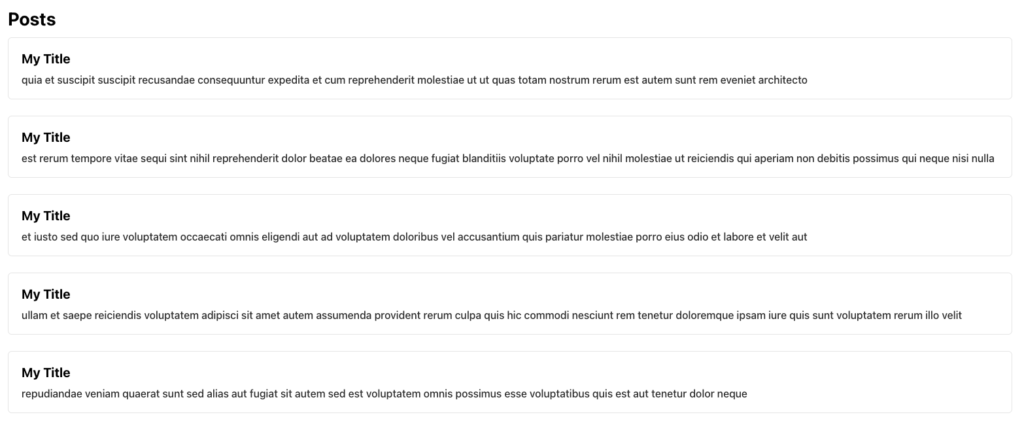
We might as well give all the Posts the same title like this:
id={post.id}
title={"My Title"}
body={post.body}
And it will be reflected in our Application:
You can also leave out the brackets when working with strings:
id={post.id}
title="My Title"
body={post.body}
Takeaways
Now, if we were to create a new list of blog articles somewhere else in our Application, rather than copying over the whole chunk of divs, we would simply import the Post component and pass down the data we need through the use of Props.
By using this approach we will be working with cleaner codebases where, rather than having 15 nested divs, we would simply have a component with a handful of properties passed down to it.
Summary
In this article we’ve been able to have a closer look at what Props are, how are they used, and when and how they should be used. We’ve also had the chance to iterate over a real-life scenario where we have been able to reap their benefits by making our codebase more modular.
I hope you have enjoyed reading this article and that you’ve got a bit more familiar with the concept of Props in React.
In case you believe I’ve left something out, or maybe I didn’t focus enough on a certain aspect of this concept, or you would have any other kind of feedback, feel free to leave a comment below!
See you at the next one. Cheers!
💬 Leave a comment