User interfaces can get confusing when we have too many active buttons. Often, it’s beneficial to disable some for the benefit of the user.
There are several cases where we’d want to disable a button in a web app. Some buttons may only be meant to be clicked once, and others can be helpful to have on screen without being able to be clicked.
In this article, we’ll go over the disabled attribute in React Buttons, and see a few examples of how it can be used.
The Disabled Attribute
Disabled is an attribute passed to React buttons. This means that it is passed into button components within JSX.
In App.js:
function App() {

  function button1Click() {
    console.log('1click')
  }

  function button2Click() {
    console.log('2click')
  }

  return (

    <div>

    <button disabled={true}>
        Disabled Button
      </button>

      <button>
        Enabled Button
      </button>

    </div>

  )

}

export default App;
In the above code, we render two buttons to the screen, identical except for their names, onClick functions, and most importantly, their disabled attribute.
We get the following output:

As we can see, the button to the left, the one that had the disabled attribute set to ‘{true}’, is automatically faded by the browser, while the other, without the disabled attribute set, is normal.
Despite having the onClick attribute set, the first button doesn’t log anything to the console when clicked. The disabled attribute prevents the onClick event from firing. As a result, we only get the output ‘2click’ logged in the console.
Using the disabled Attribute for Selections
Let’s say we have a list of items. Each item is only able to be selected one time by the user.
We’ll first create a React element for the buttons we’ll be adding to the screen to represent the different possible selections. In a file called ChildButton.js:
import { useState } from 'react'

function ChildButton(props) {

    const [disabled, setDisabled] = useState(false)

    function handleClick() {
        props.selectFruit(props.name)
        setDisabled(true)
    }

    return (

        <div>
            <button disabled={disabled} onClick={handleClick}>
                {props.name}
            </button>

            <br></br>
        </div>

    )

}

export { ChildButton }
The above code uses the useState() hook. If you’re unfamiliar with this, I’d recommend taking a quick look at this tutorial.
After importing useState, we define the ChildButton component, which takes in props as a parameter.
The first thing we do is use useState to define a variable disabled and the function for setting the variable setDisabled. This allows us to re-render the component every time disabled changes due to setDisabled being called.
Then, we define a function handleClick which uses the selectFruit function passed in props as a callback. We call it with the argument name from props, and use setDisabled to set our disabled variable to true.
Finally, we return the div that contains the element’s button as well as a line break so that the buttons will be arranged on top of one another. The important part to note is the disabled attribute, which is set to our disabled variable.
Along with the onClick attribute, which is set to execute our handleClick function when the event is called, our React component renders a button which disables itself after being clicked, as well as adds the element’s name to the parent element.
Now, let’s take a look at the parent element, in App.js:
import { useState } from 'react';
import { ChildButton } from './ChildButton';

function App() {

  const [fruitDisplay, setFruitDisplay] = useState('')
  const [selectedFruits, setSelectedFruits] = useState([])

  function selectFruit(fruit) {
    selectedFruits.push(fruit)
  }

  function _setFruitDisplay() {
    var displayString = ''

    for (var i in selectedFruits) {
      displayString += selectedFruits[i] + ' '
    }

    setFruitDisplay(displayString)
  }

  return (


    <div>

      <h1>
        Select fruits from the list below:
      </h1>

      <ChildButton name="Strawberry" selectFruit={selectFruit}/>
      <ChildButton name="Watermelon" selectFruit={selectFruit}/>
      <ChildButton name="Banana" selectFruit={selectFruit}/>
      <ChildButton name="Apple" selectFruit={selectFruit}/>

      <br></br>

      <button>
        Get selected fruits
      </button>

      {fruitDisplay}

    </div>


  )

}

export default App;
In our App component, we use useState as well.
The variable fruitDisplay is initialized as an empty string, which we can append values to later. Since we’ll need this value to refresh itself when it changes, we use useState for it.
The variable selectedFruits is initialized to an empty array, which we can push values to. We keep this separate from fruitDisplay so that we can keep track of the actual fruits we have selected, rather than just what we want to display.
The function on the next lines, selectFruit, adds the fruit passed in as a parameter to our selectedFruits array. We’ll show why we have a separate function for this later.
Next, we define the function _selectFruitDisplay, which loops through the ‘selectedFruits’ array, adding each fruit to one long string to display to the screen.
We return a header giving the user instructions, a few ChildButton elements, a button for getting the currently selected fruits, and the currently selected fruits themselves.
One thing to note is how we pass in selectFruit as a callback to each of the ChildButton components. This allows the child component to call out parent component’s function via props (as we saw earlier).
Let’s see how it all comes together!
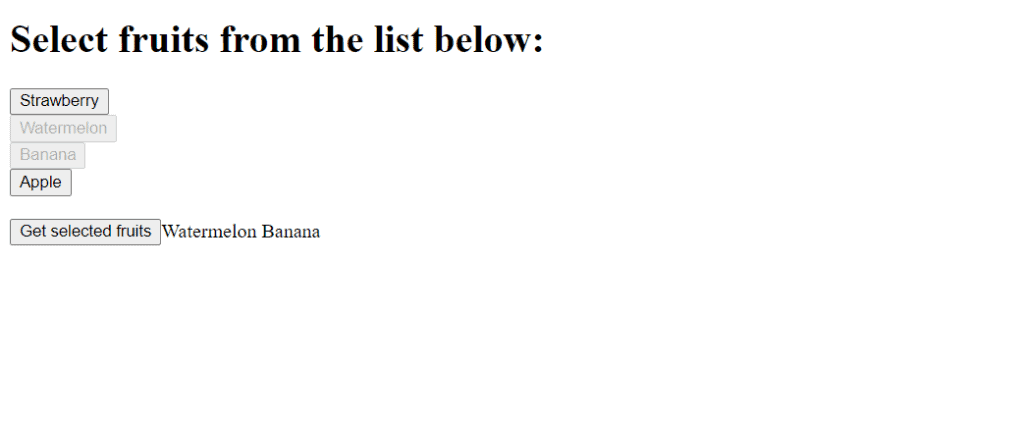
As we can see, we can select items from the list by clicking. We disable the button after it’s clicked, so that the user can only select it once. When we press ‘Get selected fruits’, the currently selected fruits are displayed to the screen, corresponding to the buttons that have been pressed (and disabled).
Let’s add a slight twist to this example, because few stores have only one of each item. Instead of disabling the button on the first click, we’ll disable it after a predetermined amount of clicks, and display the amount of items remaining to the screen.
In App.js, all we’ll do is add an ‘amount’ attribute to each ChildButton:
<ChildButton name="Strawberry" selectFruit={selectFruit} amount={5}/>
<ChildButton name="Watermelon" selectFruit={selectFruit} amount={3}/>
<ChildButton name="Banana" selectFruit={selectFruit} amount={2}/>
<ChildButton name="Apple" selectFruit={selectFruit} amount={7}/>
To make the limited amount feature work, we’ll have to make a few changes to ChildButton.js:
import { useState } from 'react'

function ChildButton(props) {

    const [disabled, setDisabled] = useState(false)
    var [amount, setAmount] = useState(props.amount)

    function handleClick() {
        props.selectFruit(props.name)

        amount -= 1
        setAmount(amount)

        if (amount == 0) {
            setDisabled(true)
        }
    }

    return (

        <div>
            <button disabled={disabled} onClick={handleClick}>
                {props.name}: {amount} left
            </button>

            <br></br>
        </div>

    )

}

export { ChildButton }
In the above code, we’ve used useState to define a new variable amount, which will track how many of the item we have left.
Then, in our handleClick() function, we decrement amount by 1, and use setAmount() to update the display. If our amount equals 0, we’ve run out of the item, and so we use setDisabled() to disable the button.
We return a similar element to the screen, with some added text showing how many of the element we have left.
We get the following render:
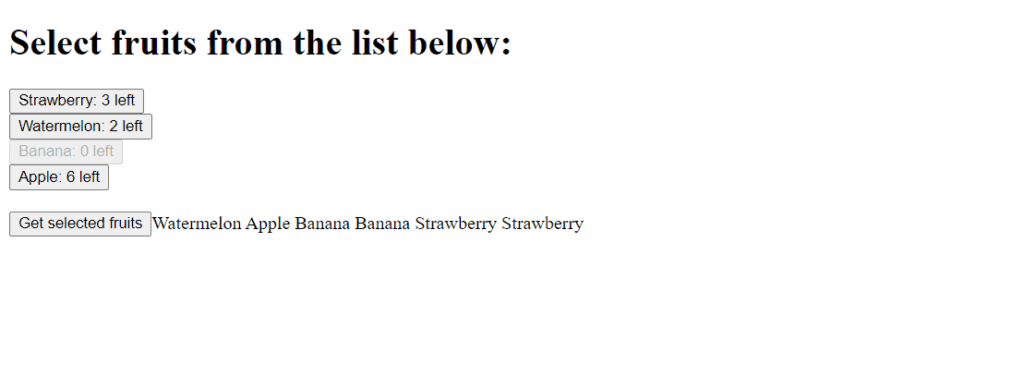
It worked! We can select items until there are none left in the given category, during which we will disable the button.
That’s it for this tutorial! Please leave any questions or comments below.
💬 Leave a comment