In this article, we’ll be looking over how we can implement GraphQL in our React Application with the help of Apollo. There are a lot of ways to integrate GraphQL in our React apps, but I do really prefer Apollo over any other alternative.
If you aren’t already familiar with GraphQL, there’s this article you can check which should give you a fundamental understanding of why it is important and when you might want to use it.
If you already are, you might also want to check this article where we go in-depth into how to set up a GraphQL server with Node.js & Express.js.
The repository that contains all of the code that’s going to be featured in this article can be found here.
Be sure to also check out the GraphQL server repository which we are going to be interacting with here.
Project Setup
1. Setup React Project
First of all, we’ll start by creating a new React project. This can be done through either npm or yarn. I personally prefer yarn, but you can use npm as well, there’s no issue there.
2. Install Required Dependencies
Since we’ll only be working on some more basic stuff, there are only 2 libraries you would need to install in order to setup Apollo:
- @apollo/client, which contains pretty much everything you might need in order to set up the Apollo Client.
- graphql, which provides the logic for handling GraphQL queries.
3. Setup Apollo Client
Now that we have both required dependencies installed, we can proceed by setting up the Apollo Client.
First, let’s add the required imports from @apollo/client:
import { ApolloClient, InMemoryCache, ApolloProvider } from '@apollo/client';- ApolloClient is the main class which, once instantiated, will create a new instance of an Apollo client (We can have multiple ones).
- InMemoryCache is a class that we’ll use in order to let Apollo Client handle the caching process of its requests.
- ApolloProvider is a component that receives as props a client, which will allow us to inject an Apollo Client into our Application.
Let’s now move onto creating our very first Apollo Client:
const apolloClient = new ApolloClient({
  uri: 'http://localhost:8080/graphql',
  cache: new InMemoryCache(),
});
Here you can see we’re passing 2 properties to the ApolloClient’s contructor. Those are used to specify the endpoint of the Back-End GraphQL server, as well as the caching mechanism that Apollo will use (We’ve passed the default one that we’ve imported – InMemoryCache).
That’s pretty much all we need to setup our client.
4. Hook Up Apollo Client
The last step of the setup process would be connecting the Apollo Client to our React Application. We can do so by wrapping our <App /> component within the <ApolloProvider> component:
root.render(
  <React.StrictMode>
    <ApolloProvider client={apolloClient}>
      <App />
    </ApolloProvider>
  </React.StrictMode>
);
Our App.js should look something like this now:
import React from 'react';
import ReactDOM from 'react-dom/client';
import './index.css';
import App from './App';
import { ApolloClient, InMemoryCache, ApolloProvider } from '@apollo/client';
const apolloClient = new ApolloClient({
  uri: 'http://localhost:8080/graphql',
  cache: new InMemoryCache(),
});
const root = ReactDOM.createRoot(document.getElementById('root'));
root.render(
  <React.StrictMode>
    <ApolloProvider client={apolloClient}>
      <App />
    </ApolloProvider>
  </React.StrictMode>
);
Fetching Data With useQuery
Now that we’ve finished setting up the Apollo Client, we can start using some tools provided by the @apollo/client library, as well as by the graphql library.
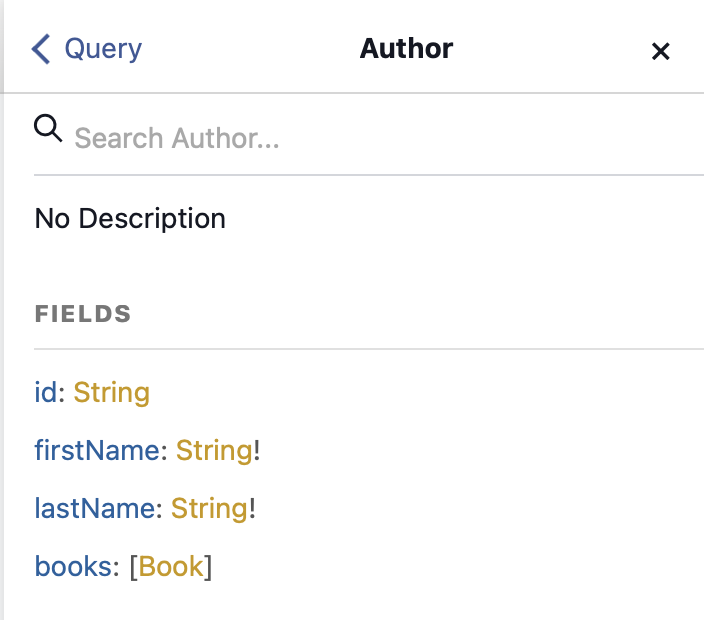
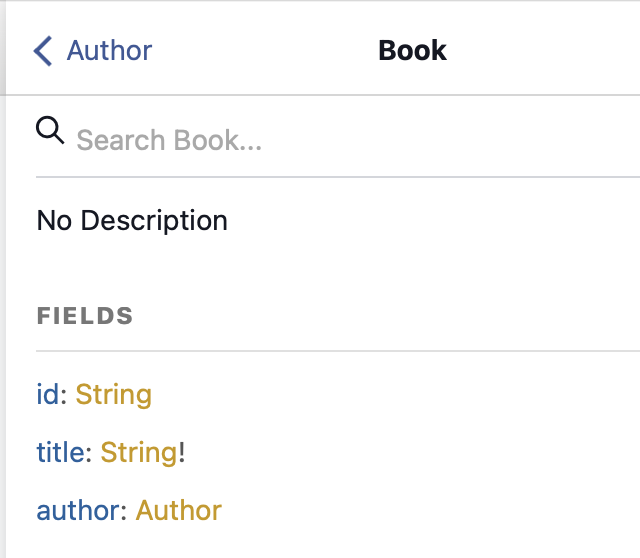
For this article there should also be a repository which showcases a basic GraphQL server built using Node.js and Express, which grants us access to some Authors and some Books.
An Author can have multiple Books, but a Book can only have one Author, so the Schema behind that looks something like this:
Let’s dive into some simple use-cases, such as retrieving the authors and the books they have written. First we’ll have to create a GraphQL query, which can be done as such:
const GET_AUTHORS_WITH_BOOKS_QUERY = gql`
    query {
      authors {
        id
        firstName
        lastName
        books {
          id
          title
        }
      }
    }
  `;
Secondly we’ll have to query our data using the useQuery hook:
const { data, loading, error } = useQuery(GET_AUTHORS_WITH_BOOKS_QUERY);As you can see, we’ll have access to 3 important properties:
- data, which represents the data we have queried (According to the gql query we have defined earlier)
- loading, which gives us the state of the request, specifically whether it has finished loading or not
- error, which, in case the request fails, will indicate to us what issues have there been encountered (Validation, Server Down, etc.)
And now we can make use of these properties to work with our data:
return (
    <div className="App">
      <div className="authors-container">
        {loading ? (
          <p>Loading Authors...</p>
        ) : error ? (
          <p>There was an issue loading the data...</p>
        ) : (
          data?.authors.map((author) => (
            <div className="user-record" key={author.id}>
              <p>Author: {author.firstName + " " + author.lastName}</p>
              <div className="author-books-container">
                {author?.books?.length && <h3>Books Written:</h3>}
                {author?.books?.map((book) => (
                  <div className="author-book-record">
                    <p>Book Title: {book.title}</p>
                  </div>
                ))}
              </div>
            </div>
          ))
        )}
      </div>
    </div>
  );
Here, as you can see, we’ll be retrieving all of the authors we have stored and we’ll display their name and the titles of the books they have written on the screen.
All of the properties defined beforehand are reactive, meaning that the only thing we have to do is use them and everything will hook up nicely with our React app; that means that as soon as the loading process finishes, for example, the loading variable’s value will change to be falsy, and then we’ll know we have access to either the data property, or the error property.
Updating/Creating Data with useMutation
The process of updating or mutating data is rather similar to that of querying data, the only differences being between the keywords we use (query vs mutation), as well as what we receive from invoking the hook, that being an array that provides us with a function to trigger the mutation, as well as for the other properties we receive from the useQuery hook (data, loading, error).
The mutation query would look something like this for creating a new Author:
const ADD_AUTHOR_MUTATION = gql`
    mutation CreateAuthor($firstName: String!, $lastName: String!) {
      createAuthor(
        firstName: $firstName
        lastName: $lastName
      ) {
        id
      }
    }
  `;
The useMutation hook call would look something like this:
const [addAuthor] = useMutation(ADD_AUTHOR_MUTATION);We won’t make use of the data, loading, and error properties, as we’ll just fire and forget the mutation function.
As for the JSX, and the rest of the React code, we’ll create a new form to input the author’s first name and last name on whose submission we’ll trigger an addAuthor function call to create that new Author record.
The final App.js file would look something like this:
import { useState } from "react";
import { useQuery, useMutation, gql } from "@apollo/client";
import "./App.css";
function App() {
  const [authorFirstName, setAuthorFirstName] = useState("");
  const [authorLastName, setAuthorLastName] = useState("");
  const GET_AUTHORS_WITH_BOOKS_QUERY = gql`
    query {
      authors {
        id
        firstName
        lastName
        books {
          id
          title
        }
      }
    }
  `;
  const ADD_AUTHOR_MUTATION = gql`
    mutation CreateAuthor($firstName: String!, $lastName: String!) {
      createAuthor(
        firstName: $firstName
        lastName: $lastName
      ) {
        id
      }
    }
  `;
  const { data, loading, error, refetch } = useQuery(GET_AUTHORS_WITH_BOOKS_QUERY);
  const [addAuthor] = useMutation(ADD_AUTHOR_MUTATION);
  const handleSubmitForm = (e) => {
    e.preventDefault(); // Avoid refreshing the page
    addAuthor({
      variables: {
        firstName: authorFirstName,
        lastName: authorLastName,
      },
    });
    refetch();
  };
  return (
    <div className="App">
      <div className="authors-container">
        {loading ? (
          <p>Loading Authors...</p>
        ) : error ? (
          <p>There was an issue loading the data...</p>
        ) : (
          data?.authors.map((author) => (
            <div className="user-record" key={author.id}>
              <p>Author: {author.firstName + " " + author.lastName}</p>
              <div className="author-books-container">
                {author?.books?.length && <h3>Books Written:</h3>}
                {author?.books?.map((book) => (
                  <div className="author-book-record">
                    <p>Book Title: {book.title}</p>
                  </div>
                ))}
              </div>
            </div>
          ))
        )}
      </div>
      <div className="add-author-container">
        <form onSubmit={(e) => handleSubmitForm(e)}>
          <input
            type="text"
            value={authorFirstName}
            onChange={(e) => setAuthorFirstName(e.target.value)}
          />
          <input
            type="text"
            value={authorLastName}
            onChange={(e) => setAuthorLastName(e.target.value)}
          />
          <button type="submit">Add Author</button>
        </form>
      </div>
    </div>
  );
}
export default App;
So there you have it. You should have a basic Apollo integration that you can now build upon as the complexity of your application grows larger.
As your application grows you might want to start looking into separating queries and mutations in separate global, feature, or view specific directories. You might also want to look into creating hooks to handle common queries or mutations, so you’ll improve reusability of code, as well as removing redundant duplicacy.
I hope you enjoyed reading this article and it helped you understand the fundamentals of setting up GraphQL in your React application with the help of Apollo. If you feel like I’ve missed something let me know in the comments below.
Until next time. Cheers!
💬 Leave a comment