In this article, we’ll have a walkthrough of the entire process of setting up a GraphQL server using Node.js & Express. We’ll be using Express’ middleware library, express-graphql, in order to assist us with that process.
If you aren’t already familiar with GraphQL and what we are using it for, be sure to check this article where we go in-depth about what GraphQL is and why we should be using it in our applications.
If you are already familiar with it, you might want to check the article where we are implementing Apollo Client with React to connect to the server we are now going to create.
The repository that contains the code featured in this article can be found here.
There would also be a repository containing the Front-End that’s making use of this server; it can be found here.
So, without further ado, let’s get started:
GraphQL Server Configuration Setup
First, we might want to start by creating a new directory, setting up npm through the npm init command, and then creating our server.js file which will host our GraphQL server.
Once we’ve got that in order, we’ll want to install the following libraries:
- express
- express-graphql
- graphql
- cors
The server.js file should be looking something like this:
const app = require("express")();
const cors = require('cors');
const { graphqlHTTP } = require("express-graphql");
const { buildSchema } = require("graphql");
const schema = buildSchema('');
const root = {
};
app.use(cors());
app.use(
  "/graphql",
  graphqlHTTP({
    schema,
    rootValue: root,
    graphiql: true,
  })
);
app.listen(8080, () => {
  console.log('GraphQL server running on port 8080');
});
Let’s go through each step of the configuration process so we can get a better understanding of what’s actually happening:
- First import express and call the main function it exports so we can set up our application server through the app variable
- Import the cors library’s main function to help us with the issue of running our server on a different domain (localhost with different ports)
- Import the graphqlHTTP method from express-graphql library to help us with the configuration
- Import the buildSchema method from the graphql library to define the data schema (What data we allow clients to access)
- Define an empty data schema for now
- Define an empty root for now, but that’s going to be used to define our Resolvers, or how we choose to handle how data will be processed in order to be sent to the client
- Setup CORS with no additional configuration
- Define the configuration we’ll use for the “/graphql” endpoint, which is going to make use of the schema we have previously defined, the root resolvers object, as well as the playground we’ll use to test out and interact with our data in a visual matter
In order to start up the server, all you need to do is to execute the node server.js command. You can then check “localhost:8080” in your browser, and there you’ll be able to see the GraphiQL playground running, which is a visual way to interact with your data/schema.
It should look something like this:

Defining the Schema
Now that we’ve got the GraphQL all set up, let’s look into populating our GraphQL schema with some data.
For the sake of simplicity, we’ll work with some more basic models and define a basic relationship between these models. We would have an Author model and a Book model, which would have the following schemas:
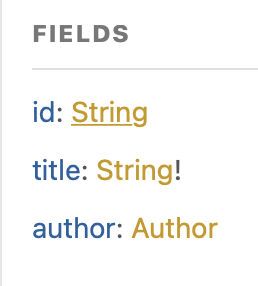
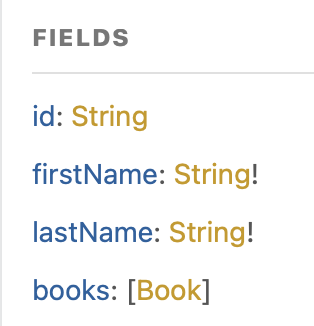
As you can see from the attached images, we’ll have 2 basic models with 3, respectively 4 fields, where we also define a one-to-many relationship. That signifies the fact that an author can write many books, while a book can only have one author.
This is how we would define those models schemas in code:
const schema = buildSchema(
  `
    type Query {
      authors: [Author]
      books: [Book]
    }

    type Author {
      id: String
      firstName: String!
      lastName: String!
      books: [Book]
    }

    type Book {
      id: String
      title: String!
      author: Author
    }
  `
);
We’ll also have to define our parent Query type, which hosts all the queries that retrieve data. After defining the parent query, we’ll have to define the schemas for the Author & Book models.
You can notice the “!” sign after some field types, and that signifies that a field is non-nullable. Square brackets ( “[]” ) around a type mean that it is an Array.
Mocking Our Data
We now have the schema defined, but there are 2 more things missing: data & resolvers to resolve the data on queries.
Let’s first start by mocking our data accordingly to the schema we have previously defined:
const mockedAuthors = [
  {
    id: '1',
    firstName: "Mike",
    lastName: "Ross",
  },
  {
    id: '2',
    firstName: "John",
    lastName: "Miles",
    books: [
      {
        id: '1',
        title: "Book 1",
        author: {
          id: '2',
          firstName: "John",
          lastName: "Miles",
        },
      },
      {
        id: '2',
        title: "Book 2",
        author: {
          id: '2',
          firstName: "John",
          lastName: "Miles",
        },
      },
    ],
  },
];

const mockedBooks = {
  '1': {
    title: "Book 1",
    author: mockedAuthors["2"],
  },
  '2': {
    title: "Book 2",
    author: mockedAuthors["2"],
  },
};
As you might notice, “Mike Ross” hasn’t written any books yet, and that’s not an issue because the Author schema doesn’t require any Books within its array. Furthermore, there is no need to even define an array of Books at all as the schema doesn’t require it. We could, however, change that by changing the type of the books field on the Author to: [Book]!, which would then require at least an array, empty or not.
Defining the Resolvers
Now that we have both the schema and the data defined, we can finish by defining the resolvers we’ll use to actually handle how we’ll deliver that data to the client.
For now, we’ll only need 2 resolvers:
- One for resolving the authors’ data
- One for resolving the books data
We’ll define the resolvers in the root as such:
const root = {
  authors: () => mockedAuthors,
  books: () => mockedBooks,
};
As you can see in the code snippet above, the process of defining resolvers is quite straightforward. There will be a property that acts as a query name, which means that by querying “authors” specifically, all in lowercase, you’ll get the “mockedAuthors” data.
Notice that we’re also passing functions as values to the properties, that is crucial.
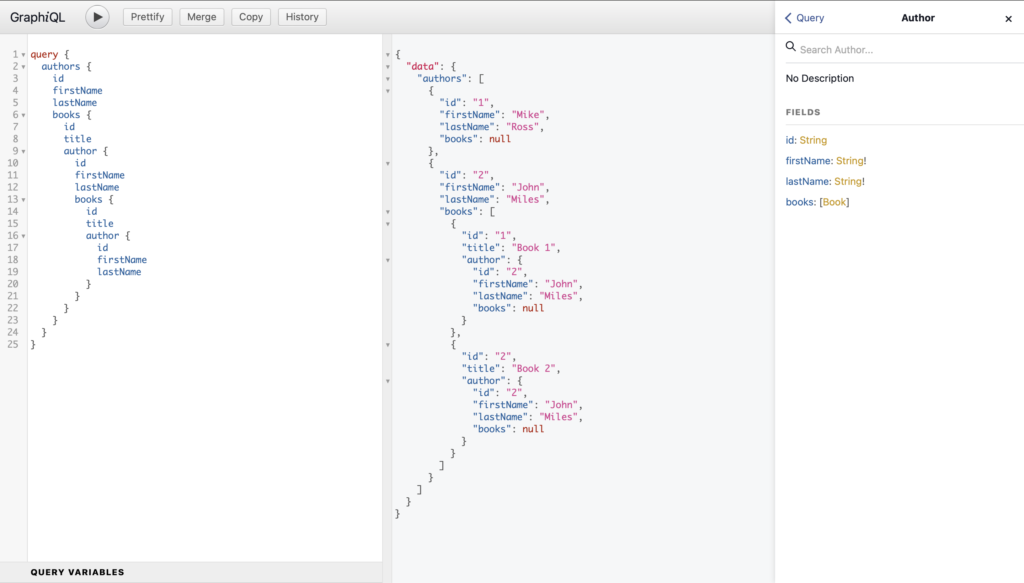
Let’s now test everything so we can make sure that it’s working as expected:
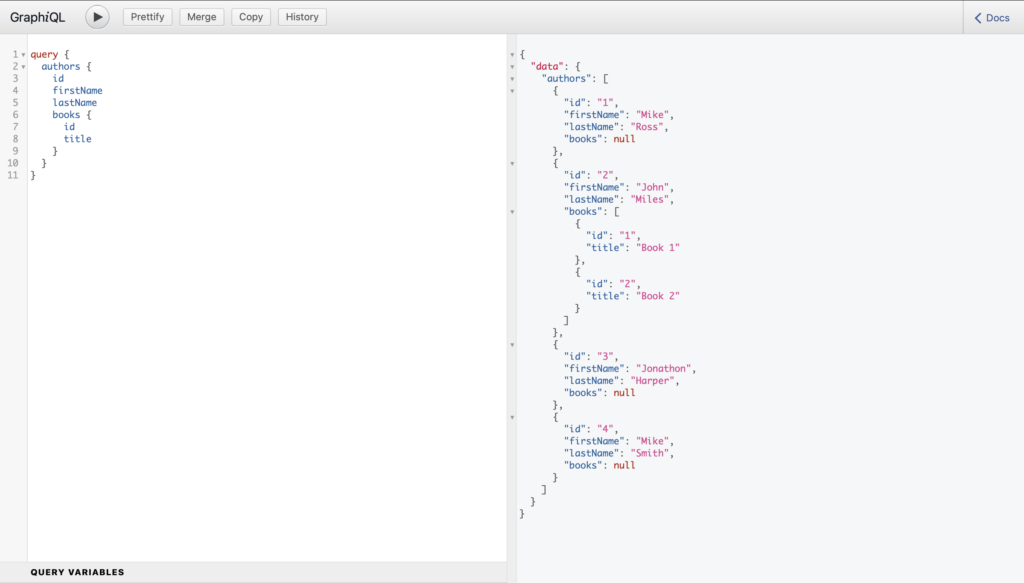
As you can see, it’s all working fine as expected. We’re using the specific terminology of GraphQL by mentioning that we are doing a query, using the “query” keyword followed by the properties/types/entries that we wish to query. In this case, we wished to query for all properties of the Author type, but only for the id and title for the Book type; we’ve skipped the Author field.
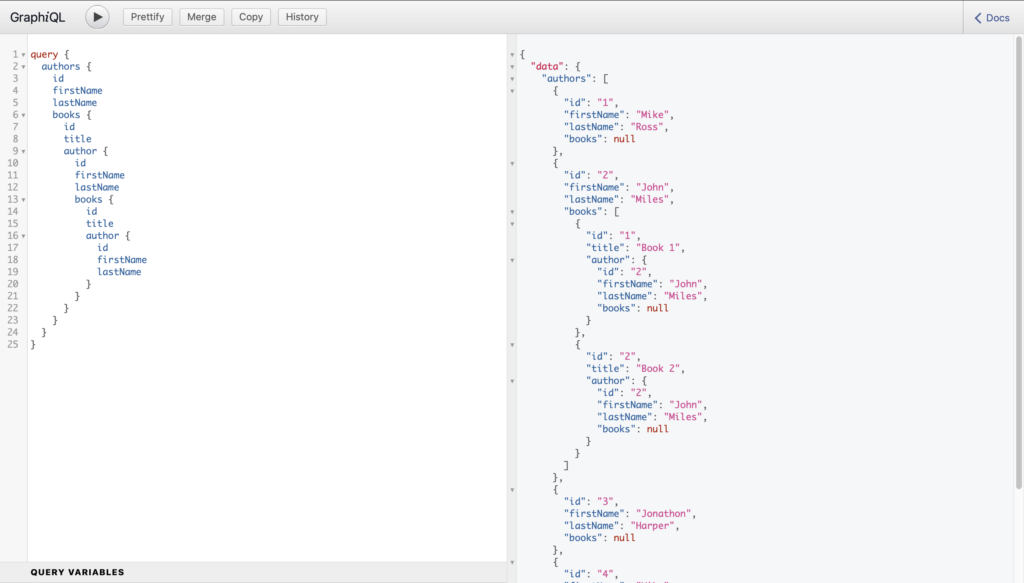
Because we’ve mocked data to include authors within books, we might do circular queries such as this one:
So, there you have it. You can see how easy it is to setup a GraphQL server and define the schema and resolvers for it. By defining the types, you not only have validation in place, but you might also access Documentation from the playground you’ve chosen.
GraphiQL provides a top right-side little Docs menu that pops out and shows you the documentation for all of the types defined within the Schema:
Now that we’ve set up the workflow of working with retrieving data with the use of queries, we shall also look at how we can modify already existing data with the use of mutations.
Defining Mutations
While we use queries to retrieve data, we use mutations to create, modify or delete existing data.
Let’s say that we’re trying to create a new Author entry, the way we would do that would be by defining a new parent “Mutation” type that will have as fields the mutations we might use throughout our system. After that, we would have to define the resolver for that, and Voila! That would be pretty much all we need to do.
The code snippet below should illustrate the final server.js file with the ability to create a new Author entry:
const app = require("express")();
const cors = require('cors');
const { graphqlHTTP } = require("express-graphql");
const { buildSchema } = require("graphql");
const schema = buildSchema(
  `
    type Query {
      authors: [Author]
      books: [Book]
    }
    type Mutation {
      createAuthor(
        firstName: String!,
        lastName: String!
      ): Author
    }
    type Author {
      id: String
      firstName: String!
      lastName: String!
      books: [Book]
    }
    type Book {
      id: String
      title: String!
      author: Author
    }
  `
);
const mockedAuthors = [
  {
    id: '1',
    firstName: "Mike",
    lastName: "Ross",
  },
  {
    id: '2',
    firstName: "John",
    lastName: "Miles",
    books: [
      {
        id: '1',
        title: "Book 1",
        author: {
          id: '2',
          firstName: "John",
          lastName: "Miles",
        },
      },
      {
        id: '2',
        title: "Book 2",
        author: {
          id: '2',
          firstName: "John",
          lastName: "Miles",
        },
      },
    ],
  },
];
const mockedBooks = {
  '1': {
    title: "Book 1",
    author: mockedAuthors["2"],
  },
  '2': {
    title: "Book 2",
    author: mockedAuthors["2"],
  },
};
const root = {
  authors: () => mockedAuthors,
  books: () => mockedBooks,
  createAuthor: ({ firstName, lastName }) => {
    const id = String(mockedAuthors.length + 1);
    const createdAuthor = {
      id,
      firstName,
      lastName
    };
    mockedAuthors.push(createdAuthor);
    return createdAuthor;
  }
};
app.use(cors());
app.use(
  "/graphql",
  graphqlHTTP({
    schema,
    rootValue: root,
    graphiql: true,
  })
);
app.listen(8080);
So there you have it. You should have a working GraphQL server that you can interact with in order to retrieve and modify or delete data.
You might choose to start looking into separating resolvers and schema types into separate directories and files and aggregate them in the server.js file and much more; the options are endless when considering scaling GraphQL applications. After all, that’s one of the reasons it’s been built in the first place.
I hope you enjoyed reading this article and that it helped you understand the fundamentals of setting up your GraphQL server using Node.js & Express. If you feel like I’ve missed something let me know in the comments below.
Until next time. Cheers!
💬 Leave a comment