As your project continues to grow, it also begins to be harder to track and control, especially in the case of more developers joining the project. So what can you do?
In order to avoid creating a messy project that’s fuelled by spaghetti code, some common conventions, methodologies, and tools shall be set up, favorably towards the beginning of the project in order to assure that all the code looks more or less the same everywhere.
One such tool is ESLint.
Introduction to ESLint
What it does it that it “statistically analyzes your code to quickly find problems” and is built within most code editors.
It sounds vague, but what it actually does is that it allows you to configure certain rulings and conventions in your code in order to guard against common issues such as bad naming conventions, possible leaks, redundant code, etc.
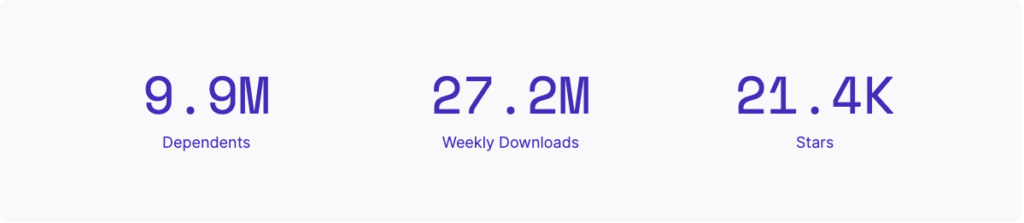
It is commonly highly regarded by the JavaScript community, and it’s not a surprise judging by the numbers alone:
Configuration Setup
Now that we know what ESLint is, let’s see how we can bring it into our React projects.
Project Setup
Let’s start by creating a new project using the CRA tooling available to us, as well as your package manager of choice:
- npx:
npx create-react-app app-name - npm:
npm init react-app app-name - yarn:
yarn create react-app app-name
This should give us a new empty project that we’ll use to configure our linter.
ESLint Setup
The next step would be to initialize the linter using the following command:
npm init @eslint/config
That, in turn, might ask you to install the config creator package:
@eslint/create-config@<version_name>
Next, you might want to start ticking some options such as:
- “How would you like to use ESLint?” – I chose the last option
- “What type of modules does your project use?” – First option (“Import”/”Export”)
- “Which framework does your project use?” – First option (“React”)
- “Does your project use TypeScript?” – First option (“No”)
- “Where does your code run?” – First option (“Browser”)
- “Use a popular style guide” – Leave empty for now
- “Which style guide do you want to follow?” – Second option (“Standard”)
- “What format do you want your config file to be in?” – First option (“JavaScript”)
After finishing the configuration you might be prompted to install the missing dependencies, which would look something like this:
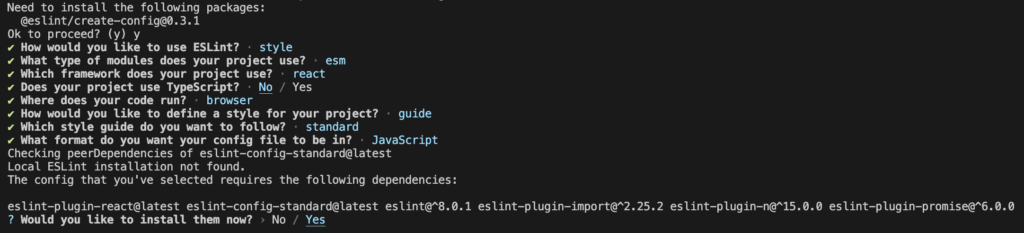
You shall install them using your preferred package manager.
You should now see a new .eslintrc.js file which looks like this:
module.exports = {
  env: {
    browser: true,
    es2021: true,
  },
  extends: ["plugin:react/recommended", "standard"],
  overrides: [],
  parserOptions: {
    ecmaVersion: "latest",
    sourceType: "module",
  },
  plugins: ["react"],
  rules: {},
};
As you might notice, it’s all indicative of the options we’ve chosen in the previous steps, such as:
env, which resembles the environment in which the project will be runparserOptionsextends, which is indicative of an already existing configuration preset we’re extending based onrules, which will contain any linting rules that we wish to add or override (Will default to an empty object) from the preset
Creating our first rules
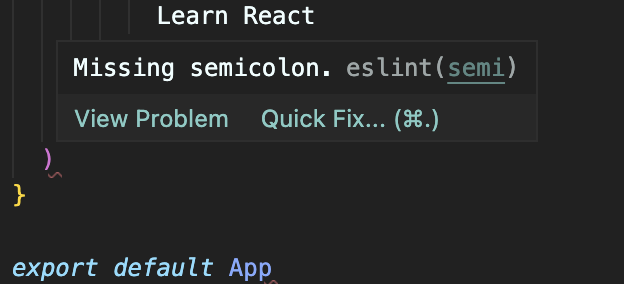
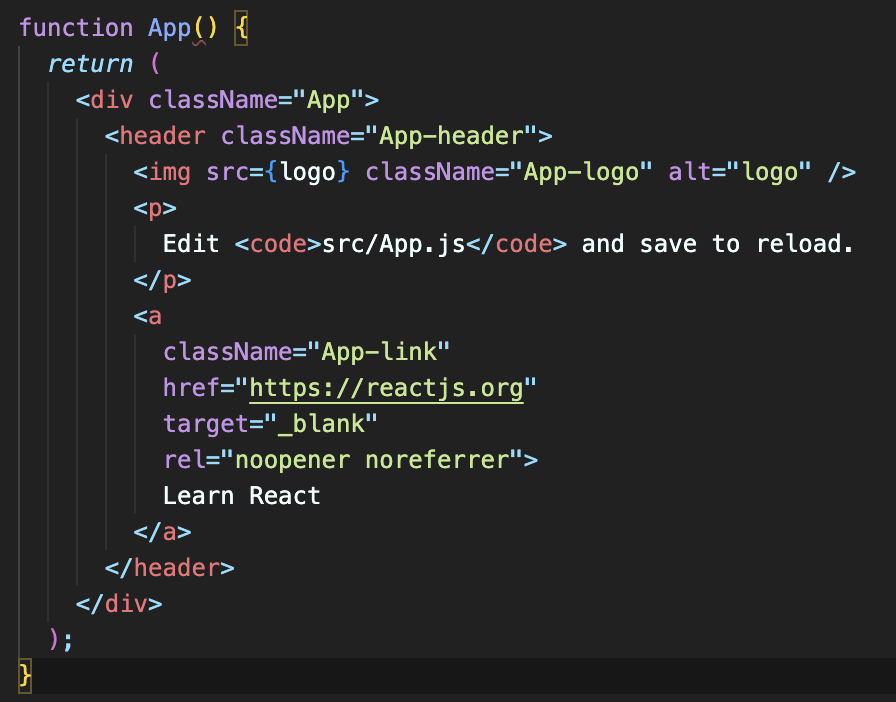
If we were to browse through our existing files, we should already see some warning and error messages as a result of our linting configuration. One example would be our src/App.js file, where we’re getting the following errors:
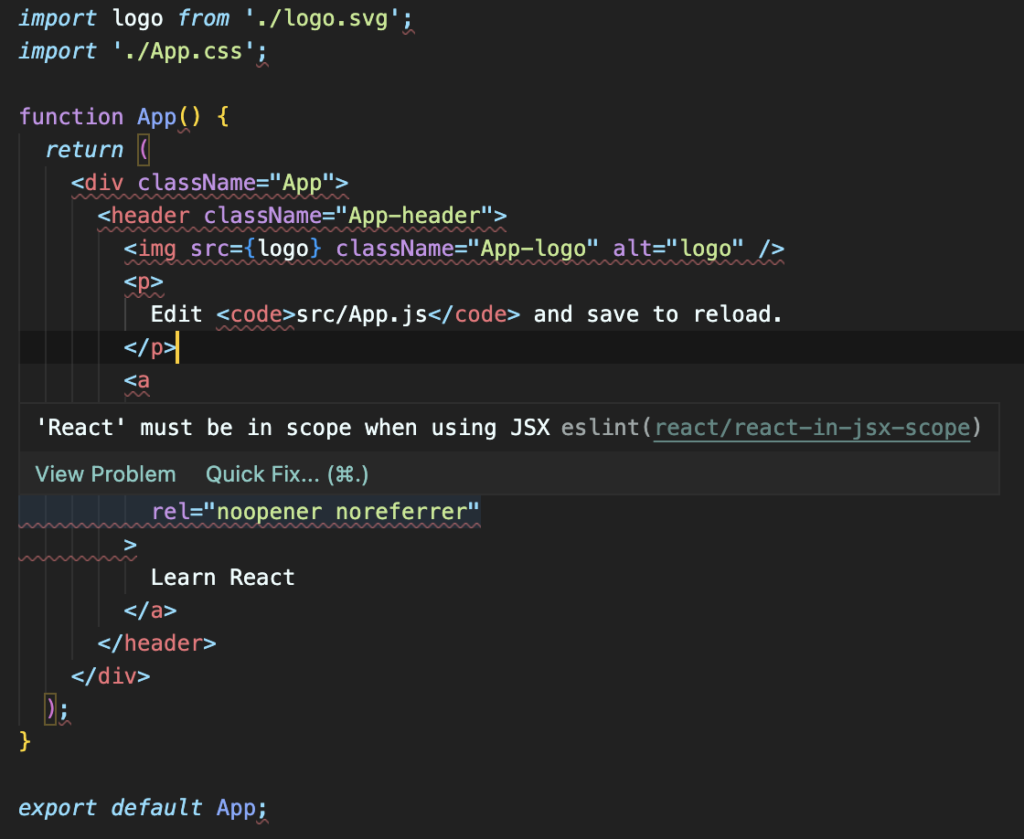
With React’s version 18 we no longer require the React import at the top of our components anymore, as such, the first rule is redundant.
Semicolons might be a good delimitator at the end of JavaScript statements, so I do consider that it is better to just leave them alone, so we should remove the second rule error as well.
With that said, let’s change our .eslintrc.js file to remove the need of the React import at the top of the file, as well as the rule for the unrequired semicolons:
module.exports = {
env: {
browser: true,
es2021: true,
},
extends: ["plugin:react/recommended", "standard"],
overrides: [],
parserOptions: {
ecmaVersion: "latest",
sourceType: "module",
},
plugins: ["react"],
rules: {
semi: ["error", "always"],
},
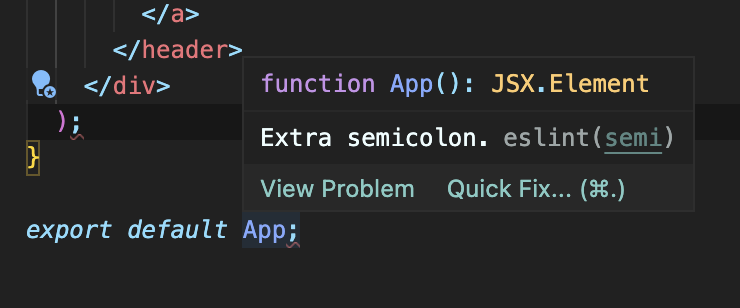
};Now, if we were to go back to our src/App.js file we should see that we are no longer getting an error for any extra semicolons, but we would get another error if we were to remove them:
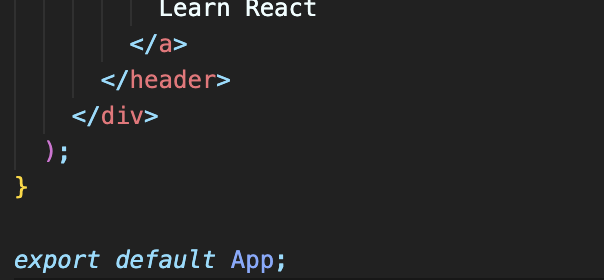
Let’s now tackle the required React import at the top of our JSX files:
module.exports = {
  env: {
    browser: true,
    es2021: true,
  },
  extends: ["plugin:react/recommended", "standard"],
  overrides: [],
  parserOptions: {
    ecmaVersion: "latest",
    sourceType: "module",
  },
  plugins: ["react"],
  rules: {
    semi: ["error", "always"],
    "react/react-in-jsx-scope": "off",
  },
};
Which, as a result, would no longer require us to add “React” at the top of our files:
You might notice, though, that there’s one more issue left to fix around the parentheses. You might either consider fixing that by adding a new space before the parentheses or, you could just disable the rule. That’s up to you 😉.
If you wish to fix the issue, you could do so either:
- Manually, by editing the code
- By using the “fix this … issue” button that’s shown if you hover over the error
- By running the
npx eslint file-to-fix.jsoryarn run eslint file-to-fix.js - Or by creating a new
lint:fixcommand in thepackage.jsonfile
Creating a linting script
If we were to go with the latter, which is much easier in my opinion, the command would look something like this: "lint:fix": "eslint --fix --ext .js,.jsx,.ts,.tsx .".
And can be run from the terminal like so:

And that will fix our parenthesis issue, as well as any other issue we might have in any of our .js or .jsx files.
Summary
Hopefully, you’ve enjoyed the read, and, more importantly, I hope you’ve got a better understanding of what ESLint is, what it does, as well as when and how you should use it.
In this article I’ve tried going over all of the essential stuff and some basic rules; in case you want an overview of all the configurable rules of the linter, you can check out the list here.
In case you believe I’ve missed anything, feel free to leave a comment below and I’ll make sure to take that into account.
Cheers!
💬 Leave a comment