TailwindCSS is a popular utility-first CSS framework that allows developers to quickly and easily build responsive, consistent user interfaces. Next.js is a popular React-based framework, which works perfectly with Tailwind. If you’re using vanilla React, we also have an article covering using Tailwind with that here. In this article, I’ll show you how to set up TailwindCSS with Next.js.
Setting Up Next.js
If you’re adding TailwindCSS to an existing app, you can feel free to skip this step.
First, we will need to create a new Next.js project. We can do this by running the following command in our terminal:
npx create-next-app my-app
# or with TypeScript
npx create-next-app@latest --ts
# and with eslint
npx create-next-app@latest --eslint
This will create a new directory called “my-app” with the basic structure of a Next.js project. Feel free to swap out “my-app” for whatever your app should be called. I also tend to use TypeScript with my Next.js apps, but you can choose either TypeScript or JavaScript.
Installing TailwindCSS
Firstly let’s install TailwindCSS:
npm install -D tailwindcss postcss autoprefixerAnd initialise Tailwind’s config:
npx tailwindcss init -pNext we need to set up our config to search for our files. Here’s the empty config:
/** @type {import('tailwindcss').Config} */
module.exports = {
  content: [],
  theme: {
    extend: {},
  },
  plugins: [],
}
We need to add in the paths for our files.
/** @type {import('tailwindcss').Config} */
module.exports = {
  content: [
      //If you're using the src/ directory
    "./src/**/*.{js,ts,jsx,tsx}",

      //If you're using the default paths:
    "./app/**/*.{js,ts,jsx,tsx}",
    "./pages/**/*.{js,ts,jsx,tsx}",
    "./components/**/*.{js,ts,jsx,tsx}",

  ],
  theme: {
    extend: {},
  },
  plugins: [],
}
In your Next.js app, you should have a global CSS file at “styles/globals.css”. Add in these at the very start:
@tailwind base;
@tailwind components;
@tailwind utilities;
And that’s it, TailwindCSS is set up in your app!
Prettier
With TailwindCSS, you’re likely to end up with very long class names, which can get messy. One thing that can help with this is Tailwind’s Prettier plugin, which automatically sorts class names.
If you already have Prettier set up, all you need to do is run:
npm install -D prettier prettier-plugin-tailwindcssBuilding a Profile Card
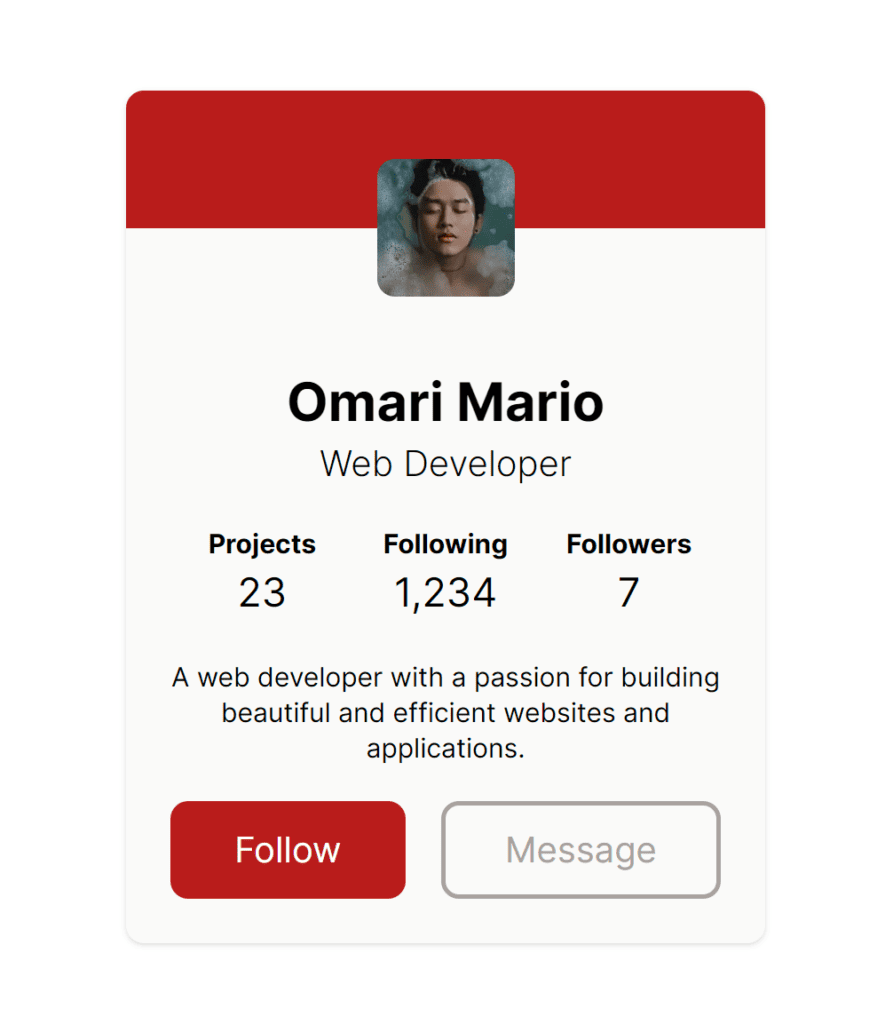
Now, let’s try building something with Next.js. Here’s what the end result will look like:
First, let’s start off with just editing our page. Here’s the component (with some extra removed)
export default function Home() {
    return (
        <>

            <main
                className={clsx(
                    'flex h-screen w-full items-center justify-center',
                    inter.className
                )}>
                <ProfileCard />
            </main>
        </>
    );
}
Tailwind works through preset class names that provide a clean style system. Here’s what the classes for our main element get translated to:
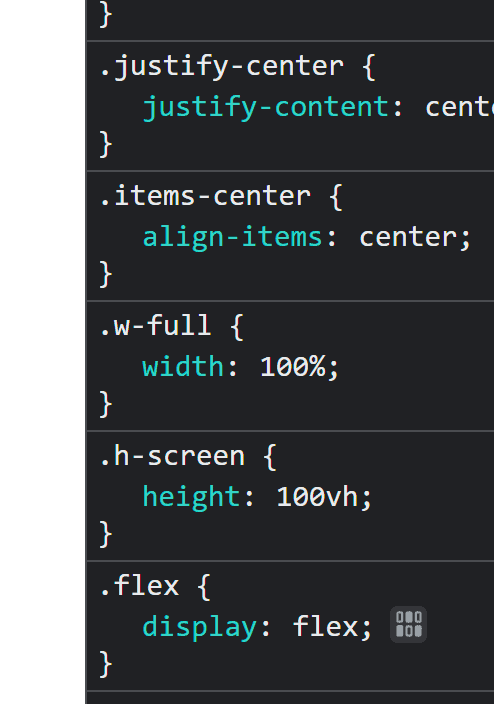
A lot of the time these class names will be similar or identical to their CSS rule, but if you’re unsure feel free to take a look through Tailwind’s documentation.
One issue you might run into a lot is combining class names with JavaScript logic like a variable, adding classes conditionally, or in my case using the class names provided by Next.js’ new font system. I use clsx to get around this, which is a small package that provides the clsx() function, which lets you easily combine groups of class names by passing them in as arguments.
Now let’s drill into our components, starting off with the profile card itself:
function ProfileCard() {
    return (
        <div className="flex h-96 w-72 flex-col items-center justify-between overflow-clip rounded-lg bg-stone-50 shadow">
            <Header />
            <div className="flex w-full grow flex-col items-center justify-start gap-4 px-5 pb-5">
                <Title />
                <Stats />
                <Brief />
                <Buttons />
            </div>
        </div>
    );
}
Again we have some obvious classes like “flex flex-col” meaning set display to a flex box with the items vertical, or shadow which applies a shadow.
Any CSS rules that need a numerical value like height, width, Tailwind provides a large list of preset sizes. These run from a range of preset rem values, e.g. h-96 means “height: 24rem”, but also include some other helpful values, such as “-screen” (100vw), -auto “auto”, etc. You can check out the full list here.
Tailwind also provides a huge default colour palette, providing some named colours, and a range of brightnesses. Check out the full palette here.
Conditional Classes
Tailwind provides a lot of conditional classes for different states, such as hover, active and different screen sizes. I’ve used this inside the Button component:
function Buttons() {
    return (
        <div className="flex w-full items-center justify-center gap-4">
            <button className="grow rounded-lg border-2 border-red-700 bg-red-700 p-2 text-white transition-all hover:brightness-[.90] active:brightness-[0.5]">
                Follow
            </button>
            <button className="box-border grow rounded-lg border-2 border-stone-400 p-2 text-stone-400 transition-all hover:brightness-[.90] active:brightness-[0.5]">
                Message
            </button>
        </div>
    );
}
We get a simple effect when we hover, using “hover:brightness-[.90]”, as well as when we click, using “active:brightness-[0.5]”. One important thing to note is that you should prefix every class separately, e.g.:
    const classes = 'hover:p-10 hover:bg-red-50'; //✔️
    const classes = 'hover:p-10 bg-red-50'; //❌
Here’s the end result:

Conclusion
Thanks for reading! Hopefully, with this article, you were able to get TailwindCSS set up in your Next.js app, and get started building some components. If you liked this article, feel free to leave a comment below!
💬 Leave a comment