If you’ve worked on larger projects that do not already use Redux, you’ve probably encountered Prop Drilling and know how annoying and bad-looking that process is.
However, if you haven’t, there is an article on the subject that you can check out here.
One solution to that problem, as well as some other architectural ones, is Redux.
What is Redux?
As its official website says, Redux is “A Predictable State Container for JS Apps”.
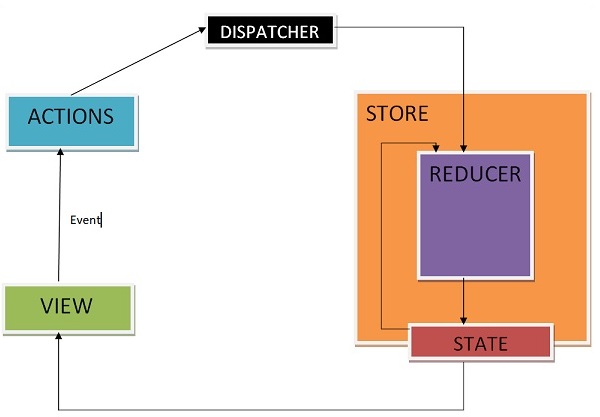
It allows us to centralize our data flow into a single container called a store, with whom we can interact using actions.
Actions are commands we delegate to our reducers to retrieve or manipulate contained data.
Reducers are storage entries. A store can have one or more reducers, usually separated as per feature.
Imagine we could have a list of todos that make up a reducer. A reducer may act upon certain CRUD operations as it’s instructed once a specific action has been delegated in this regard.
Let’s say that we may have the following actions defined for our repository:
getAllTodos, which retrieves all of the stored reducer todoscreateTodo, which contains the information required to create a new todoupdateTodo, which includes the id of the todo we wish to update, as well as its new dataremoveTodo, which consists of the id of the todo we want to remove
When working with Redux, we have to delegate actions to make changes to the store state, as it is read-only.
That means that we rewrite the actual reducer state every time we make a change.
Redux Data Flow
The data flow in Redux looks something like this:
Redux Setup
Now that we’ve got a better idea of what Redux is let’s see how we can add it to our React Application.
Create a New React Project
Let’s start by creating a brand new React project. We can do so by using the CRA terminal command:
- npm:
npm init react-app app-name - npx
: npx create-react-app app-name - yarn:
yarn create react-app app-name
That will give us a new React project.
Install Redux Dependencies
The modern way of adding Redux to our React application would require us to install the newer Redux Toolkit toolset, as well as the react-redux utility package, which we can both add through our package manager of choice:
- npm:
npm install @reduxjs/toolkit react-redux - yarn:
yarn add @reduxjs/toolkit react-redux
That should give us all the required utilities to set up our store and retrieve and set data.
Redux Store Configuration
For this step, we’ll have to create a new store/index.js file under the src/ directory to store the Redux store configuration:
import { configureStore } from '@reduxjs/toolkit';

const store = configureStore({});

export default store;
For now, we’ll leave the parameter for the configureStore function empty. There we’ll have to add the reducers that we’ll define in a later step.
Now we’ll want to reference the store globally, so we’ll be able to access it from anywhere in our application.
We’ll do that in our src/index.js file as such:
import React from "react";
import ReactDOM from "react-dom/client";
import { Provider } from "react-redux";
import "./index.css";
import App from "./App";
import store from "./store";

const root = ReactDOM.createRoot(document.getElementById("root"));

root.render(
  <Provider store={store}>
    <App />
  </Provider>
);
Reducer Setup
Having the store set up, we can proceed with the configuration of our reducer; for this article, we’ll go over the reducer for a todos app.
The reducer will be defined under a new reducers/ directory inside the already existing store/ directory and will contain a JS file with the feature name, which, in our case, is “todos”:
const initialState = [];

const todosReducer = (state = initialState, action) => {
  switch (action.type) {
    case "GET_TODOS":
      return state;

    case "ADD_TODO":
      return [...state, action.payload.todo];

    case "UPDATE_TODO":
      return state.map((todo) => {
        if (todo.id === action.payload.todoId) {
          return {
            ...todo,
            ...action.payload.data,
          };
        }

        return todo;
      });

    case "REMOVE_TODO":
      return state.filter((todo) => todo.id !== action.payload.todoId);

    default:
      return state;
  }
};

export default todosReducer;
All Redux reducers expect two main arguments:
- The reducer state
- An incoming action
Whenever we dispatch a command, it will be passed as a parameter to a reducer call; that’s why we also have the “type” property on each action, as that allows us to differentiate between each command received in the reducer.
We also have to reference this reducer in the store configuration now so that Redux knows about it:
import { configureStore } from "@reduxjs/toolkit";
import todosReducer from "./reducers/todos";

const store = configureStore({
  reducer: {
    todos: todosReducer,
  },
});

export default store;
The todos is the keyword we’ll use when retrieving the todos data, thus the property name for the todosReducer reducer inside the store configuration.
Actions Setup
As mentioned at the beginning of the article, we’ll have 4 CRUD actions that we’ll define in a new todos.js file under a new actions/ directory under the already existing store/ directory.
This file will contain all of our action definitions. The actions will not be referenced in the store but rather be called throughout our application whenever we may need them.
The code for the actions will look something like this:
export const getTodos = () => ({
  type: "GET_TODOS",
});

export const addTodo = (data) => ({
  type: "ADD_TODO",
  payload: {
    todo: data,
  },
});

export const updateTodo = (todoId, data) => ({
  type: "UPDATE_TODO",
  payload: {
    todoId: todoId,
    data,
  },
});

export const removeTodo = (todoId) => ({
  type: "REMOVE_TODO",
  payload: {
    todoId,
  },
});
There’s nothing too fancy; we do have a type property within the object we’ll return for each action for our reducer to be able to differentiate between various actions, as well as any optional data through the payload property.
Core Functionality Implementation
Now that we’ve set up the main store logic let’s implement the system behind the todos management.
We’ll have a list of todos, a form where we can create new todos, and a card for each todo where we’ll showcase its data and the options to update or remove it.
Application Demo
You can find the final code here.
Summary
I hope you’ve enjoyed the read and have got a better understanding of what Redux is, what it is mainly used for, and also got to see it in action.
Feel free to give me feedback by leaving a comment in the comments section below.
Cheers!
💬 Leave a comment