In this article, I’ll cover what’s Redux, how and when should you use it, and also give you code examples.
Note:
This article assumes that you have a basic knowledge of React, Javascript.
What’s Redux?
Redux is a state management library for Javascript apps. Even though you can use Redux with many popular libraries or frameworks like React, Angular, and even with VanillaJS, Redux is generally used in React applications as both Redux and React are open source projects of Meta (Facebook).
When should you use Redux?
Redux keeps your state in a store and this store is accessible from anywhere in your React components. For example, let’s say we want a counter project that has two buttons increase(+) and decrease(-) and we have a count state. We can have an App component and also a Button component.
If we don’t use Redux for this project, we could store the count state in the App component and pass down the increase/decrease event handler function to the Button component as props. The Button component would get the event handler in props and call the event handler function when clicked on.
You can see the code for a counter project without Redux here:
https://github.com/upmostly/counter-without-redux
Generally, we should use Redux when we have global states and that states need to be accessed and mutated from many other components. For example, the count state in the above function could be stored in a Redux store, in that case, we wouldn’t have to pass event handlers as props to the Button component because we could access the count state directly inside the Button component.
So, let’s make a Redux version of the above project together from scratch.
Make a counter project with Redux:
Before diving into the project, let’s learn the basics of Redux.
Store: A store is a state container that holds the application’s state. We can access the store from any component and read the state, mutate the state.
Action:
An action is a plain Javascript object that has a type field. We put actions in dispatch functions, that way we can update the Redux state.
The type field should be a string that gives this action a descriptive name, like “todos/todoAdded”. We usually write type string in this format: “domain/eventName”. An action object can have other fields with additional information about what happened, by convention, we put that information in a field called payload.
Reducer: A reducer is a function that receives the current state and an action object, decides how to update the state if necessary, and returns the new state ((state, action) => newState). We can think of a reducer as an event listener which handles events (mutates state) based on the received action.
Reducers must always follow specific rules:
- They should only calculate new state value based on the state and action arguments
- They are not allowed to modify the existing state. Instead, they must make immutable updates, by copying the existing state and making changes to the copied values.
- They must not do any async logic, calculate random values, or cause other “side effects”
I think I covered the basics about Redux, let’s jump right into the project.
So, I want you to clone the counter-without-redux repository above, we’ll make it counter-with-redux now.
After cloning, please install the required npm packages by typing the below code into the terminal:
npm install @reduxjs/toolkit react-reduxNow, “@reduxjs/toolkit “ and “react-redux” libraries are added to our package.json file.
Step 1: Create a slice
A slice is a collection of Redux reducer logic and actions for a single feature in our app. We have one feature, for example, count in our case and we have actions, selectors, and reducers in a single slice.
Create a Features folder under src and put Count.js in it:
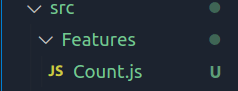
In Count.js, copy and paste this code:
import { createSlice } from '@reduxjs/toolkit';
export const Slice = createSlice({
    name: "count",
    initialState: {
        count: 0
    },
    reducers: {
        increase: (state) => {
            state.count += 1
        },
        decrease: (state) => {
            state.count -= 1
        }
    }
})
export const selectCount = (state) => state.count.count;
export const { increase, decrease } = Slice.actions;
export default Slice.reducer;
In the code above, increase and decrease functions are reducers, selectCount is a function that returns the current state.
At the below, we are exporting increase and decrease from Slice.actions. Basically, our Slice returns us actions to be used easily.
Step 2: Create a store, pass slices to store
Remember that Redux has a single store and every component can access it. So, let’s create a Store.
Please create a store.js file inside the src folder. And inside it, put this code:
import { configureStore } from "@reduxjs/toolkit";
import countReducer from './Features/Count';

export const Store = configureStore({
    reducer:{
        count:countReducer
    }
})
Our goal of using Redux is to have a single store for the global state, and as you can see in the above code, we’re passing our count feature as countReducer to Store’s reducer.
Step 3: Provide store in index.js
We render our react app in index.js, but for our React app to have access to Redux store, we should provide our store. Replace the code in the index.js file under the src folder with the below code:
import React from 'react';
import ReactDOM from 'react-dom';
import App from './App';
import { Provider } from 'react-redux';
import { Store } from './store';

ReactDOM.render(
  <React.StrictMode>
    <Provider store={Store}>
      <App />
    </Provider>

  </React.StrictMode>,
  document.getElementById('root')
);
The Provider is a special component from ‘react-redux’ that takes a store as its props and makes redux store available to our App component.
Step 4: Dispatch actions, in the Button component
Currently, our Button component takes the clickHandler as its props, but now we set up the Redux store, it can take increase/decrease actions that are exported from the Count slice and use them as event handlers.
Current Button.js:
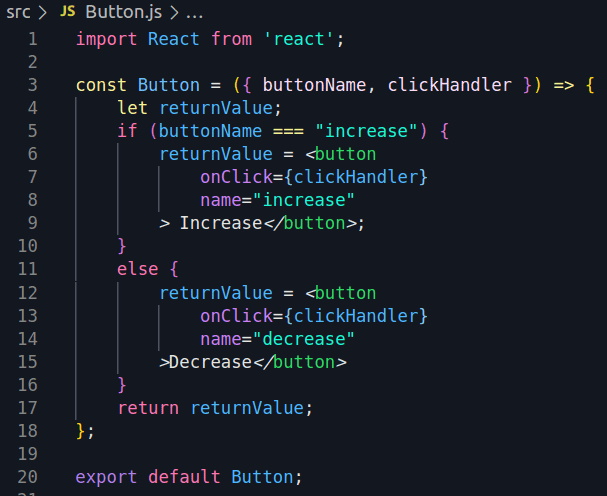
Let’s modify this code like this:
import React from 'react';
import { useDispatch } from 'react-redux';
import { increase, decrease } from './Features/Count';

const Button = ({ buttonName }) => {

    const dispatch = useDispatch();
    const increaseHandler = () => {
        dispatch(increase())
    }
    const decreaseHandler = () => {
        dispatch(decrease())
    }

    let returnValue;
    if (buttonName === "increase") {
        returnValue = <button
            onClick={increaseHandler}
            name="increase"
        > Increase</button>;
    }
    else {
        returnValue = <button
            onClick={decreaseHandler}
            name="decrease"
        >Decrease</button>
    }
    return returnValue;
};

export default Button;
As you can notice, we are not getting a clickHandler as props, instead of that, we get increase/decrease actions and dispatch (we’re getting dispatch via useDispatch hook). Then dispatch these actions in their corresponding handler function.
Step 5: Get global count state in App.js
In App.js, we should show the count. So, we need to use the useSelector hook to get the global state of the count. The current App.js file looks like this:
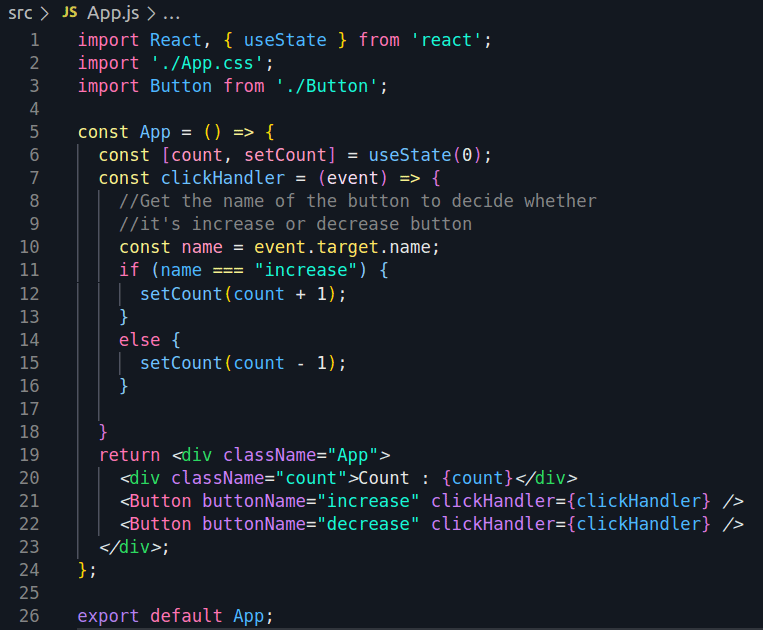
Let’s modify the App.js like this:
import React from 'react';
import './App.css';
import Button from './Button';
import { useSelector } from 'react-redux';
import { selectCount } from './Features/Count';

const App = () => {
  const count = useSelector(selectCount);

  return <div className="App">
    <div className="count">Count : {count}</div>
    <Button buttonName="increase" />
    <Button buttonName="decrease" />
  </div>;
};

export default App;
Notice that we’re not storing the count state in the App component, instead, we’re using the useSelector hook to get the count state from the Redux store.
And also notice that we’re not passing any event handlers to buttons because we handled that in the Button component above.
Here’s the finished version of our project, counter-with-redux:
https://github.com/upmostly/counter-with-redux
Summary
We’ve completed a small project to learn the basics of Redux and how to use Redux in a React project. That’s what I’ve got today for you, I hope you enjoyed the read!
💬 Leave a comment