Probably every website consumes data in one way or the other. Most commonly you will come across a situation where you need to display data in a table.
In this tutorial, we will look at how to fetch and display JSON data into a table.
Let’s get started!
Project setup
Get started by creating react app on your machine or open your browser and visit react.new
A new CodeSandbox environment will open with React project setup.
Fetching Data from API
In React, there are many ways to fetch data but for this tutorial, we will be using the fetch() function to get dummy JSON data.
We will be using a dummy JSON API https://dummyjson.com/products which returns the data of random products and further we will be using this data to display it in our table.
// App.js
import { useEffect } from "react";
import "./App.css";

function App() {
  useEffect(() => {
    fetch(`https://dummyjson.com/products`)
      .then((response) => response.json())
      .then((actualData) => console.log(actualData))
      .catch((err) => {
        console.log(err.message);
      });
  }, []);

  return (
    <div className="App">
      <p>Hello, world!</p>
    </div>
  );
}

export default App;
In this code, we’re fetching the data inside the useEffect hook so that it only loads the data on the initial render. You can learn more about how to fetch data in React here.
Run the React app and you will see the data in the console of your browser.

Next, we will see how to display this data in a table.
Creating a table in React
Create a normal HTML table inside JSX. We can also use the react-table library which has a bunch of features available but for the sake of this tutorial, we will work with the normal table.
// App.js
import { useEffect, useState } from "react";
import "./App.css";

function App() {
  useEffect(() => {
    fetch(`https://dummyjson.com/products`)
      .then((response) => response.json())
      .then((actualData) => {
        console.log(actualData);
      })
      .catch((err) => {
        console.log(err.message);
      });
  }, []);

  return (
    <div className="App">
      <tbody>
        <tr>
          <th>Name</th>
          <th>Brand</th>
          <th>Image</th>
          <th>Price</th>
          <th>Rating</th>
        </tr>
      </tbody>
    </div>
  );
}

export default App;
Now, we will make use of the useState hook to store all the data that we fetched. The data variable in the useState hook is an empty array that is being further updated by the setData function.
// App.js
import { useEffect, useState } from "react";
import "./App.css";

function App() {
  const [data, setData] = useState([]);

  const fetchData = () => {
    fetch(`https://dummyjson.com/products`)
      .then((response) => response.json())
      .then((actualData) => {
        console.log(actualData);
        setData(actualData.products);
        console.log(data);
      })
      .catch((err) => {
        console.log(err.message);
      });
  };

  useEffect(() => {
    fetchData();
  }, []);

  return (
    <div className="App">
      <tbody>
        <tr>
          <th>Name</th>
          <th>Brand</th>
          <th>Image</th>
          <th>Price</th>
          <th>Rating</th>
        </tr>
        {data.map((item, index) => (
          <tr key={index}>
            <td>{item.title}</td>
            <td>{item.brand}</td>
            <td>
              <img src={item.thumbnail} alt="" height={100} />
            </td>
            <td>{item.price}</td>
            <td>{item.rating}</td>
          </tr>
        ))}
      </tbody>
    </div>
  );
}

export default App;
In this code, we are mapping the data array which contains all the data that we fetched and displaying it inside the table. Now run the React app and open your browser.
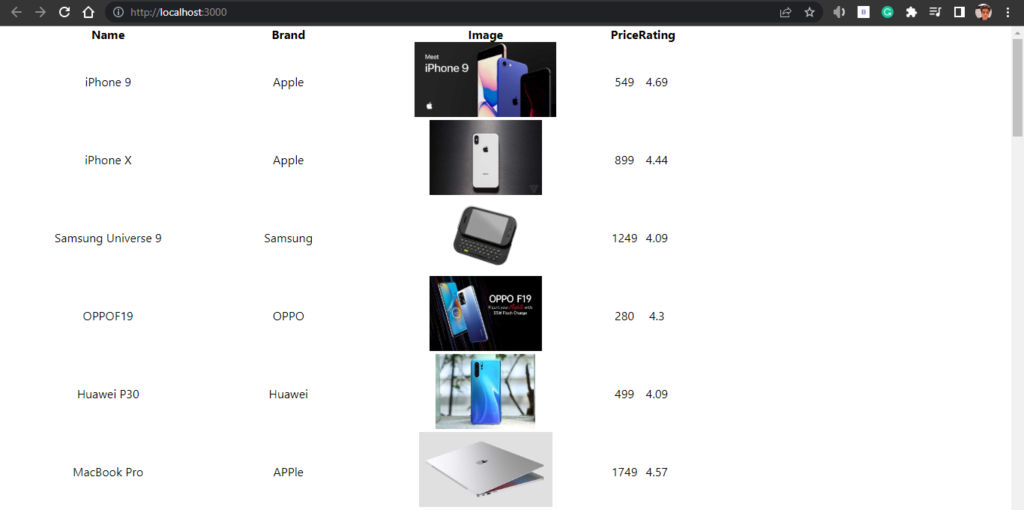
Here’s the final result.
Conclusion
Displaying JSON data inside a table is not a difficult task but many developers struggle to find the perfect way to do it. In this tutorial, we looked at how to fetch JSON data from API and display it inside a table. Now, go ahead and try to make it pretty.
Thank you so much for reading this tutorial.
Feel free to comment if you have any questions or If you have suggestions. If you want to request any article for a particular topic contact us through the about page. We would love to hear from you.
💬 Leave a comment