This article is part of a series on creating multi step form wizards in Angular.
Part 1 – Basic Setup
Part 2 – Building Our Forms
Part 3 – Tying It All Together
We are on the home stretch with our multi-step form, infact we are pretty much there! But I wanted to give a few more tips on tying everything together, including an awesome debugging trick.
The Final HTTP Post
Having a form is useless unless it actually sends data, and luckily for us, we already have a service prepared to do just that – our FormDataService! At the moment it looks like :
export class FormDataService{

  personalDetails : PersonalDetails;
  addressDetails : AddressDetails;

  constructor() {
    this.personalDetails = new PersonalDetails();
    this.addressDetails = new AddressDetails();
   }
}
Our best bet is to add a simple “postData” method that collates everything together and talks to some backend API (Not features). For example :
export class FormDataService{

  personalDetails : PersonalDetails;
  addressDetails : AddressDetails;

  constructor() {
    this.personalDetails = new PersonalDetails();
    this.addressDetails = new AddressDetails();
   }

   postData(){
     let newCombinedObject = {
       personalDetails : this.personalDetails,
       fullAddress : this.addressDetails.fullAddress
     }

     //Use somthing like http.post etc to send the data to the backend server.
   }
}
I know that this is a bit of a simplistic view, but it’s hard to get into the nitty gritty without also building out an actual API. The point I want to make here though is that we have all the models from all the different steps of the form, we can take all of that data and mould it into our API model. In my case, I have taken the full personalDetails object, but from the address I’ve taken out the individual property. It’s up to you to transform the data how you need it, but the idea is that it’s all there to play with!
Heading back to our Address Details component, if we add in a click event handler to our backend :
export class AddressDetailsComponent implements OnInit {

  addressDetails : AddressDetails;

  constructor(private formDataService : FormDataService) {
    this.addressDetails = formDataService.addressDetails;
  }

  ngOnInit() {
  }

  submit(){
    this.formDataService.postData();
  }

}
And then bind our HTML to that click event handler :
<table>
    <tr>
        <td>Full Address</td>
        <td><input type="text" [(ngModel)]="addressDetails.fullAddress" #fullAddress /></td>
    </tr>
    <tr>
        <td><input type="button" value="Back" routerLink="" /></td>
        <td><input type="button" value="Complete" (click)="submit()" /></td>
    </tr>
</table>
And we have a full complete submit routine!
Debugging Helper
The biggest thing I struggle with when building out extremely large forms with multiple steps is testing each individual input. Namely, that when I get to the end of the form to submit… I’ve almost forgotten what it was I typed at the start!
There’s actually a nice way to debug this (Atleast in Dev). The first thing we want to do is go to a parent component of our entire form, in our example project’s case, that’s simply the app-component. The first thing we do is inject the formDataService into the backend.
export class AppComponent {
  constructor(public formDataService : FormDataService) {
  }
}
Then we need to edit the HTML of the AppComponent to output the models of the service as JSON. That looks like so :
<h1>My Multistep Form</h1>
<router-outlet></router-outlet>
Personal Details : {{this.formDataService.personalDetails | json}} <br />
Address Details : {{this.formDataService.addressDetails | json}}
Now as we fill out the form, on all steps we have a live update of how our model actually looks on the backend.
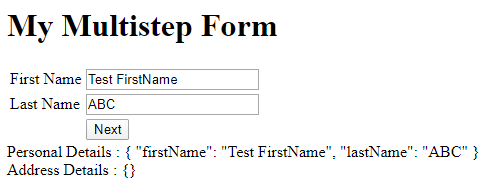
Not only is it handy when we get to the end of the form to be able to see what we “should” be submitting just before we submit it, but also if we have any complex controls/custom controls in our form, we can see exactly what’s going on in the backend as we fill them out.
Is This The Best Method?
Finally I just want to touch on if this is the “best” way of achieving a multi step wizard in Angular. You could probably swap out “best” for “most efficient”, “proper”, “up to date”, however you want to say it. As I said early on, this is the way I’ve been building these sorts of forms since the very early days of Angular. It’s served me well and even with things like Reactive Forms and RxJS becoming increasingly popular, I find this to be the most straight forward method. There’s no hidden “magic” or library doing things on the backend, it’s just simple code that works.
💬 Leave a comment