This article is part of a series on creating multi step form wizards in Angular.
Part 1 – Basic Setup
Part 2 – Building Our Forms
Part 3 – Tying It All Together
In the last part of this series on building a multi step form wizard, we got a simple project up and running, but it wasn’t really doing a heck of a lot. Let’s change that by building out the HTML forms to capture some basic information.
Personal Details Form Build
The first thing we want to do is to generate a new component called “PersonalDetails”. We can do that in the Angular CLI :
ng generate component PersonalDetailsThe first thing we need to do is wire up the component to pull in the service, and load the personal details model out. Without too much faffing about, it will look like :
export class PersonalDetailsComponent implements OnInit {

  personalDetails : PersonalDetails;

  constructor(private formDataService : FormDataService) {
    this.personalDetails = formDataService.personalDetails;
  }

  ngOnInit() {
  }

}
Pretty simple really. Inject the service in, pull out the personal details model, and set it locally. Remember that because the FormDataService is a singleton, for our entire app (per page load), there will only ever be one instance.
Next, we can replace personal-details.component.html with the following amazingly styled HTML.
<table>
<tr>
<td>First Name</td>
<td><input type="text" [(ngModel)]="personalDetails.firstName" #firstName /></td>
</tr>
<tr>
<td>Last Name</td>
<td><input type="text" [(ngModel)]="personalDetails.lastName" #lastName /></td>
</tr>
<tr>
<td> </td>
<td><input type="button" value="Next" routerLink="addressdetails" /></td>
</tr>
</table>Not yes, we are using tables. And yes this is not going to look great at all but it’s just a demo!
Everything here should be rather straight forward. We have two text boxes, and they bind to the personal details object on the component. Then we have a next button that routes to our (future) address details component. This link obviously won’t work right now, and will actually break everything if you try and view it! Grrr!
What we need to do is first create the AddressDetails component by going
ng generate component AddressDetailsThen we need to open up our app-routing.module.ts file, at the top will be a const of routes that will (probably) be empty right now. Change it to the following :
const routes: Routes = [
  { path : '',   component : PersonalDetailsComponent },
  { path : 'addressdetails',   component : AddressDetailsComponent },
];
This then wires up our two components, the first will be on the homepage, and the next will be at /addressdetails.
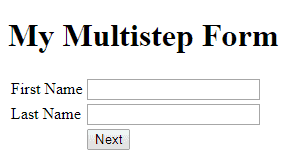
Run a quick ng serve, and we should end up with something like :

It’s not pretty, but it works! Click Next will take us to our AddressDetails component which is actually empty. So let’s fix that!
Address Details Form Build
We’ve already generated our AddressDetails component so that we could route to it, so let’s just fill it out.
Our component definition should look like so :
export class AddressDetailsComponent implements OnInit {

  addressDetails : AddressDetails;

  constructor(private formDataService : FormDataService) {
    this.addressDetails = formDataService.addressDetails;
  }

  ngOnInit() {
  }

}
And the actual HTML of the component should look like :
<table>
    <tr>
        <td>Full Address</td>
        <td><input type="text" [(ngModel)]="addressDetails.fullAddress" #fullAddress /></td>
    </tr>
    <tr>
        <td><input type="button" value="Back" routerLink="" /></td>
        <td><input type="button" value="Complete" /></td>
    </tr>
</table>
Now we could go ahead and deep dive this code but I think it’s pretty self explanatory. In our component we load out the FormDataService which is actually the exact same instance we used in the PersonalDetails component (Infact we could access the PersonalDetails model if required here), and then we display a simple form bound to the AddressDetails model.
Now the most important think to notice is that if we run our solution and test it. We can type in our personal details, press next, enter in our address details, but then press *Back*. Our Personal Details are re-loaded out of our shared service and pre-populated into the form! We haven’t had to do some crazy loading/unloading of models into our form, simple data binding does the magic for us.
In the next part of this series, we will look at how we then post our data to an API, and some tips and tricks working with larger multi step forms. Check it out here.
💬 Leave a comment