Are you tired of dealing with tedious form validation in your React applications? Look no further than React Hook Forms in Next.js!
RHF is a React hook that provides a simple and intuitive API for managing form state, validation, and submission. It supports both controlled and uncontrolled components, as well as dynamic form fields, custom validation rules, and more. We’ll be covering Next.js in this article, so if you’re using plain React, check out this article.
In this article, we’ll explore how to use this lightweight and easy-to-use library to streamline your form validation process and make your life as a developer a whole lot easier.
Getting Started
To get started with RHF, you first need to install it in your project. You can do this by running the following command in your terminal:
npm install --save react-hook-formSet-Up
Let’s set up some validation on an HTML form for credit card input. Here’s the form we’ll be working on:
And here’s the code for the whole page:
export default function FormValidation() {
    return (
        <div
            className={clsx(
                'flex h-screen w-full items-center justify-center bg-neutral-200',
                text.className
            )}>
            <form className="flex flex-col gap-2 rounded-lg bg-neutral-50 p-8 text-neutral-900 shadow">
                <label htmlFor="email">Email</label>
                <input
                    className="rounded border border-neutral-200 bg-neutral-50 p-1"
                    type="email"
                    id="email"
                    name="email"
                />

                <label htmlFor="card-number">Credit Card Number</label>
                <input
                    className="rounded border border-neutral-200 bg-neutral-50 p-1"
                    type="text"
                    id="card-number"
                    name="card-number"
                />

                <label htmlFor="card-name">Name</label>
                <input
                    className="rounded border border-neutral-200 bg-neutral-50 p-1"
                    type="text"
                    id="card-name"
                    name="card-name"
                />

                <label htmlFor="card-expiry">Expiry Date</label>
                <input
                    className="rounded border border-neutral-200 bg-neutral-50 p-1"
                    type="text"
                    id="card-expiry"
                    name="card-expiry"
                    placeholder="mm / yy"
                />

                <label htmlFor="card-cvv">CVV</label>
                <input
                    className="rounded border border-neutral-200 bg-neutral-50 p-1"
                    type="text"
                    id="card-cvv"
                    name="card-cvv"
                />
                <button className="mt-5 rounded bg-green-500 p-2 text-neutral-50    ">
                    Submit
                </button>
            </form>
        </div>
    );
}
It’s a little long, but the tl;dr of it is we have a plain vanilla form input, with some different input types you might expect to have in this kind of form, e.g. email, credit card number, as well as some styling from TailwindCSS.
Validation
Now that we have our form, our next step is to RHF-ify it. With React Hook Forms, everything revolves around the useForm() hook. It provides a register method, which you can use to register each form input with RHF:
export default function FormValidation() {
    const { register, handleSubmit } = useForm();
    const onSubmit = (data: unknown) => console.log(data);
    return (
        <div
            className={clsx(
                'flex h-screen w-full items-center justify-center bg-neutral-200',
                text.className
            )}>
            <form
                className="flex flex-col gap-2 rounded-lg bg-neutral-50 p-8 text-neutral-900 shadow"
                onSubmit={handleSubmit(onSubmit)}>
                <label htmlFor="email">Email</label>
                <input
                    className="rounded border border-neutral-200 bg-neutral-50 p-1"
                    type="email"
                    {...register('email')}
                />

                <label htmlFor="card-number">Credit Card Number</label>
                <input
                    className="rounded border border-neutral-200 bg-neutral-50 p-1"
                    type="text"
                    {...register('cardNumber')}
                />

                <label htmlFor="card-name">Name</label>
                <input
                    className="rounded border border-neutral-200 bg-neutral-50 p-1"
                    type="text"
                    {...register('name')}
                />

                <label htmlFor="card-expiry">Expiry Date</label>
                <input
                    className="rounded border border-neutral-200 bg-neutral-50 p-1"
                    type="text"
                    placeholder="mm / yy"
                    {...register('expiry')}
                />

                <label htmlFor="card-cvv">CVV</label>
                <input
                    className="rounded border border-neutral-200 bg-neutral-50 p-1"
                    type="text"
                    {...register('cvv')}
                />
                <button className="mt-5 rounded bg-green-500 p-2 text-neutral-50">
                    Submit
                </button>
            </form>
        </div>
    );
}
We’ll start off by adding some validation to our email form input. Firstly, useForm() provides us with an error object, containing any errors for any form fields. Let’s use destructuring to get this object:
export default function FormValidation() {
    const {
        register,
        handleSubmit,
        watch,
        formState: { errors },
    } = useForm<FormInputs>();
...
}
I’m also going to set up a simple Error component, just to display our error message:
function Error({ message }: { message: string }) {
    return (
        <div className="rounded  border border-red-600 bg-red-50 p-1 text-red-600">
            {message}
        </div>
    );
}
And finally, we can add validation to our email form input:
...
                <label htmlFor="email">Email</label>
                <input
                    className="rounded border border-neutral-200 bg-neutral-50 p-1 invalid:border-red-500"
                    type="email"
                    {...register('email', {
                        required: { value: true, message: 'Email Required' },
                        pattern: { value: /.+@.+/, message: 'Invalid Email' },
                    })}
                />
                {errors.email && <Error message={errors.email.message!} />}
...
The first change you’ll notice is that we’ve added a new object to our register method. This is where your validation gets added in. The validation rules supported are:
- required – If the field is required to be filled
- min – Minimum value
- max – Max value
- minLength – Minimum length in characters
- maxLength – Max length in characters
- pattern – A regex pattern to match
- validate – A custom validation function
For each validation rule, you can either provide just the rule, or an object containing the rule and a custom error message.
So for my email field I’ve set up two rules, making the field required, and also some simple regex to make sure our email at least contains an @ symbol.
Then I’m displaying the error message using the Error component shown previously.
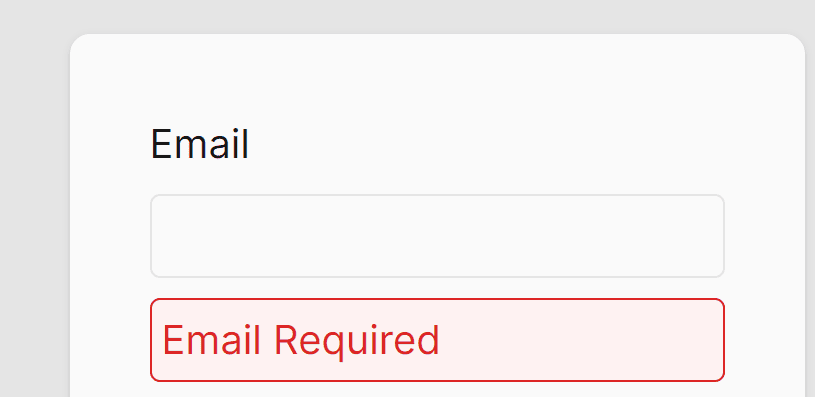
And here’s the end result:

Conclusion
Thanks for reading! If you liked this article, leave a comment below. React Hook Form is a great library that simplifies the process of handling form validation in a Next.js application, allowing you to focus on building the best user experience for your users. So, give it a try and see how it can improve your form validation process!
💬 Leave a comment