
Console.log() is one of the most useful functions you’ll ever use. It allows you to debug, create proof of concepts, and even add functionality to a web app.
In this tutorial we’ll go through all three of these categories. By the end, you’ll have a better understanding of why console.log() is so important.
An important thing to note is that console.log() is not exclusive to React! It’s a built-in method in JavaScript, and is useful outside React as well in the ways listed above.
Let’s get started!
Logging to the Console
First, if you’ve never seen console.log() before, here’s a quick example and a few instructions for how to use it within Google Chrome (other browsers should be similar). All it does is print a value to the console.
function Element() {

  console.log("Hello World");

  return (
    <div>
      Hello World
    </div>
  );

};
In the example above, we log “Hello World”.
We’ll now see how to access this variable in the console.
Just right-click on the window, in an area that gives you the following popup menu:
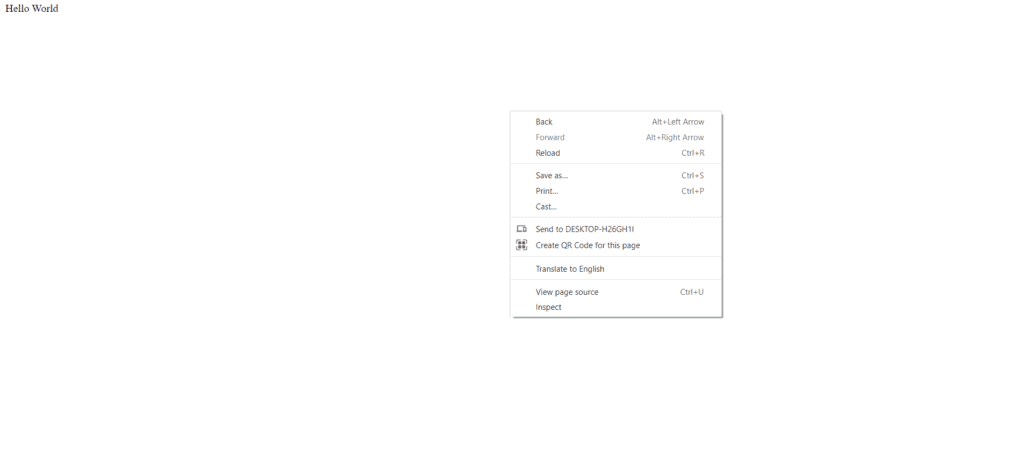
Then, click on “Inspect”. Within the window that pops up on the right side of the screen, click on the “Console” tab.

As we can see, “Hello World” is printed to the console on the right. We’ll be exploring this tool in depth in this tutorial.
Debugging
Take the following React code:
function Element() {

  //Code is OK
  const variable = 1;

  console.log('1');

  //Bug HERE
  while (true);

  console.log('2');

  return (
    <div>
      Hello World
    </div>
  );

};
The above is a straightforward example for figuring out where the bugs in the code are. The first variable declaration for ‘variable’ runs well, and “1” is logged.
However, after “1” is logged, we have a while(true) that keeps running forever, stalling our program. This is a major bug! As a result, console.log(‘2’) is never executed.
As the developer, when we see that only “1” is logged, we know that something goes wrong in between logging “1” and logging “2”. We know where to look; in this case, we would see the “while(true)” as a problem and resolve it.
Logging More than Strings
In the above examples, we log simple strings to the console. We can do much more!
Let’s log a JavaScript object to the console. If you’re unfamiliar with the concept, objects are just unordered sets of key-value pairs. There are many structures within the language that fall under this category.
In the example below, we will log an event object to the console. These are created when React events are fired.
function Element() {

  function handleClick(event) {

    console.log(event)

  }

  return (

    <div onClick={handleClick}>

      Hello World

    </div>

  );

};

export {Element};
The code above logs the event to the console when the div is clicked. When we click on the element, we get the following output in the console, as expected:

We see an arrow on the left which we can toggle to see all the attributes of the object:
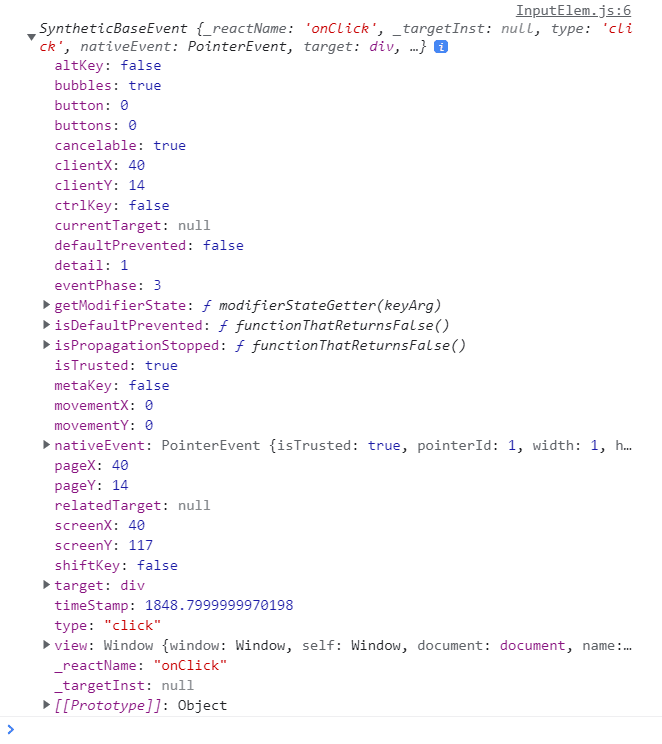
That’s a lot of object variables! console.log() allows us to see all of them in an organized fashion. If an object in our web app was misbehaving, we could log the entire object to try and diagnose what was going wrong.
Proof of Concept
Sometimes all we want to do is test a specific part of our web app, such as a function that we are using. By building out in increments and testing as we go, we can prevent huge bugs from showing up later.
For example, we’ll test the onChange event of an input field to make sure we have everything set up properly. When onChange is fired, we’ll print “Working” to the console.
function Element() {

  function handleChange() {

    console.log("Working")

  }

  return (

    <input type="text" onChange={handleChange}/>

  );

};

export {Element};
When we type a few letters into the input field, we get the following output in the console:

The above code logs “Working” exactly as we expect, proving that the function being tested, onChange in this case, is working properly. Now, we can replace console.log(“Working”) with any code that we want. We’ll know that future bugs won’t have to do with the onChange.
Sometimes, we want to test that the application does NOT do something, for example when we are in the middle of building a web app and many features are incomplete.
For example, we could be programming a button that performs an action when clicked:
function Element() {

  function handleClick() {

    //
    complexFunction();

  }

  function complexFunction() {

    console.log("complexFunction")

    // The rest of our code

  }

  return (

    <button onClick={handleClick}>
      Button
    </button>

  );

};

export {Element};
In the function handleClick, we’ve commented out complexFunction() because in our example, it’s not ready for use in the web app yet. Thus, when we DON’T see “complexFunction” in the console after clicking the button, we know that our code is working properly.
Adding Functionality
Now that we’ve seen how console.log() can be useful to a developer, we will see ways that it can be useful for the user.
In most simple web apps, the user will never open up the page’s console and view console.log()’s. However, with more technical users, it can be helpful for the user to be able to see some of the console.log()’s to see how the application is doing.
Below is a simple example that just shows that a button is working:
function Element() {

  function handleClick() {

    console.log("User click")

  }

  return (

    <button onClick={handleClick}>
      Button
    </button>

  );

};

export {Element};
While the above component is unlikely to fail, we can see how a more complex component could necessitate using console.log() for the user’s sake. Especially when fetching data over the web, complex applications can have many variables and fail for various reasons that the developer cannot control.
In these cases, console.log() can give users insight into where the application is going wrong.
Conclusion
In this tutorial, we went over console.log(), an important function for diagnosing errors, proving that the application works in the way we intend, and providing technical information to users. I hope you are now comfortable using it in your own applications.
If you have any questions or comments, please leave them below.
💬 Leave a comment