Next.js is a great React-based library, which includes some great features built-in that make getting started with your React app easy and simple. One of those features is the fairly new next/font package, which makes implementing fonts in your Next.js app quick and easy.
Getting Started
Google Fonts
One of the great features of Next’s new font package is that it comes with the ability to import fonts from Google fonts.
This awesome feature lets you easily tap into the vast library of Google fonts whenever you want. The fonts are downloaded during build time, so your app doesn’t have to make any requests to Google on the client-side. Plus, only the fonts you import are loaded, keeping things super efficient.
You can do this by importing fonts from ‘next/font/google’. The font names use Snake_Case, so if you’re struggling to find a font to import, it will likely be converted to that. For example:
import { Inter, Lexend, Source_Sans_Pro } from 'next/font/google';These give you back a method which returns an object containing parameters that let you integrate the font into your app. For example:
export const titleFont = Rubik({
    subsets: ['latin'],
    weight: 'variable',
});

export const bodyFont = Inter({
    subsets: ['latin'],
    weight: ['400', '500', '600', '700'],
});
These objects have properties for integrating the font using class names, and through style props. We can put this all together like this:
export default function Fonts() {
return (
<div className="flex h-screen w-full flex-col items-center justify-center gap-4 bg-stone-900 text-white">
<h1 className={clsx('font-text text-8xl', titleFont.className)}>
Hi, I'm Omari
</h1>
<button
className="rounded bg-teal-800 px-8 py-4 text-2xl shadow"
style={bodyFont.style}>
Let's Talk
</button>
</div>
);
}
And here’s what that looks like:

Local Fonts
Next.js also provides a method of loading local fonts, with the added benefit of the font optimisation that the package provides. Usage is very similar to Google fonts, but you must provide a path to your local font:
import localFont from 'next/font/local';

export const localInter = localFont({ src: '../../inter/Inter-Regular.ttf' });
Src can also be an array, which lets you put together a font family using different files:
export const localInter = localFont({
    src: [
        {
            path: '../../inter/Inter-Regular.ttf',
            weight: '400',
            style: 'normal',
        },
        {
            path: '../../inter/Inter-Light.ttf',
            weight: '300',
            style: 'normal',
        },
        {
            path: '../../inter/Inter-Italic.ttf',
            weight: '400',
            style: 'italic',
        },
    ],
});
TailwindCSS
Through a few quick and easy steps, you can also integrate Next.js’ font package into a Tailwind setup.
Firstly we need to add a CSS variable to our font configuration:
export const titleFont = Rubik({
    subsets: ['latin'],
    weight: 'variable',
    variable: '--font-title',
});
This exposes a property “variable” on our font object, which you can add in with the className prop:
export default function Fonts() {
return (
<div
className={clsx(
titleFont.variable,
bodyFont.variable,
'flex h-screen w-full flex-col items-center justify-center gap-4 bg-stone-900 text-white'
)}>
<h1 className={clsx('font-text text-8xl', titleFont.className)}>
Hi, I'm Omari
</h1>
<button
className="rounded bg-teal-800 px-8 py-4 text-2xl shadow"
style={bodyFont.style}>
Let's Talk
</button>
</div>
);
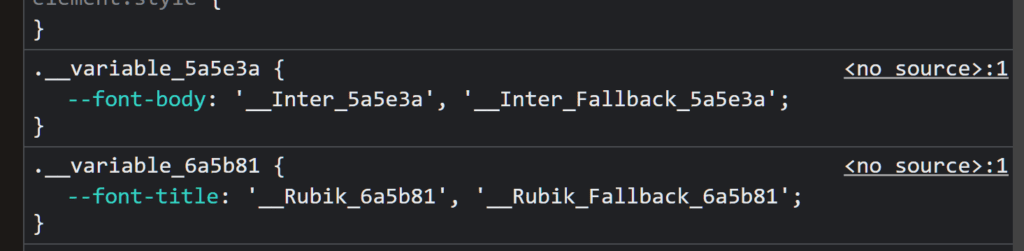
}If we have a look at the CSS for our page now, we can see the variables created:
Then we’ll head over to our tailwind config:

Adding these in provides us with new font classes to use within our app. That was a few stages of setup, but the payoff is greatly simplifying font usage within our app. We can refactor our previous component to this:
export default function Fonts() {
return (
<div
className={clsx(
titleFont.variable,
bodyFont.variable,
'flex h-screen w-full flex-col items-center justify-center gap-4 bg-stone-900 text-white'
)}>
<h1 className="font-title text-8xl">Hi, I'm Omari</h1>
<button className="rounded bg-teal-800 px-8 py-4 font-body text-2xl shadow">
Let's Talk
</button>
</div>
);
}We set up our font once, and after that, we can use them through Tailwind’s usual class name system.
Conclusion
Thanks for reading! I hope with this article, you were able to get set up using fonts in Next.js, whether through Google fonts or local files. If you liked this article, or if you need any help, feel free to leave a comment below!
💬 Leave a comment