LocalStorage is an API that lets your site store things in the browser, to persist things when you leave the site. If you’ve ever wondered how browsers do things like save your settings and preferences, there’s a good chance they’re using LocalStorage.
Checking the website for the game Wordle, for example, we can see what it’s storing in LocalStorage with the Chrome DevTools:
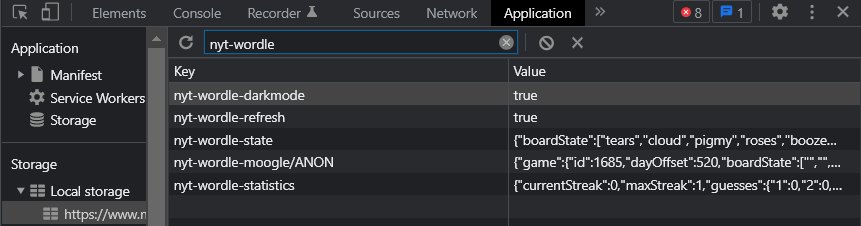
Here Wordle is using LocalStorage to store things like if I’ve selected dark mode, the state of the game so it restores when I leave the site, and my statistics.
In Next.js, you can use LocalStorage through the window interface, and wrap this around a custom hook to use throughout your code.
In this article, I’ll talk through creating something a little simpler, but something very common you might see across the web, a dark mode toggle that’s able to remember your selection when you leave the site.
Setup
Here’s the hook I’ll be using to implement all of this:
export function useLocalStorage<T>(key: string, fallbackValue: T) {
    const [value, setValue] = useState(fallbackValue);
    useEffect(() => {
        const stored = localStorage.getItem(key);
        setValue(stored ? JSON.parse(stored) : fallbackValue);
    }, [fallbackValue, key]);

    useEffect(() => {
        localStorage.setItem(key, JSON.stringify(value));
    }, [key, value]);

    return [value, setValue] as const;
}
Local Storage is stored as a sort of dictionary, with keys and values. Our generic local storage hook takes in a key to use. It also takes in a default value, just in case we can’t find our value in local storage.
We use a useState() hook to keep track of the value for when we retrieve it from local storage, and when we change it after.
There are two useEffects() in this hook. The first one handles getting the value from localStorage. If it exists we store it in our useState(), if not we use the default value. One key note here is that Local Storage only stores strings, so we convert our value to and from JSON to store/retrieve it.
Then in our second useEffect(), we’re just making sure to update the stored value whenever we change the value in our state.
Finally, we return just the values from our useState hook, we’re essentially creating a wrapper around useState to watch our value in state, and mirror it in Local Storage.
Now let’s use our custom hook to create a dark/light mode toggle, for my new blog.
Storage
The first bit of work is setting up the local storage for our theme. Thanks to the custom hook we’ve just created, this is really simple:
export function useTheme() {
    return useLocalStorage<Theme>('theme', 'light');
}
I’ve given my theme a default value of light mode.
Context
To help later on, I’m going to create a context for our theme value. You can check out this article we have for more on context in React, but they essentially allow us to store a value, and access it through any component inside our context provider without having to pass it through props.
First, we create our context:
const DarkModeContext = createContext<Theme>('light');
const SetDarkModeContext = createContext<Dispatch<SetStateAction<Theme>>>(
    (value) => {
        console.log('Default function:', value);
    }
);
This is really simple, we’re setting these up to store the value of our theme, as well as the setter that setState will return.
When using context, it’s very helpful just to create some wrapper functions for the hooks to access your context values, which is what I’ve done here:
export function useDarkModeContext() {
    return useContext(DarkModeContext);
}

export function useSetDarkModeContext() {
    return useContext(SetDarkModeContext);
}
It’s also helpful to create a wrapper function for providing your context:
export function DarkModeContextProvider({ children }: WithChildrenProps) {
    const [theme, setTheme] = useTheme();
    return (
        <DarkModeContext.Provider value={theme}>
            <SetDarkModeContext.Provider value={setTheme}>
                {children}
            </SetDarkModeContext.Provider>
        </DarkModeContext.Provider>
    );
}
You can wrap this around whichever part of your app needs access to the context, ideally just around the part that needs access to it. For this small example app, I’ve added my context provider to the default _app.tsx Next.js provides:
export default function MyApp({ Component, pageProps }: AppProps) {
    return (
        <DarkModeContextProvider>
            <Component {...pageProps} />
        </DarkModeContextProvider>
    );
}
The Component
Here’s the full code for our page:
export default function Home() {
    const theme = useDarkModeContext();
    return (
        <div
            className={clsx(
                'flex min-h-screen w-full items-center justify-center',
                theme
            )}>
            <Head>
                <title>Hello World!</title>
                <link rel="icon" href="/favicon.ico" />
            </Head>
            <main className="flex h-screen w-full flex-col gap-8 p-4 dark:bg-stone-900 dark:text-white">
                <div className="flex w-full items-center justify-between text-2xl">
                    <div>Downpartly</div>
                    <DarkModeToggle className="w-24 text-2xl" />
                </div>

                <div className="prose flex grow flex-col items-center justify-center dark:prose-invert">
                    <h1>Mastering TypeScript’s New “satisfies” Operator</h1>
                    <div className="flex items-center justify-center gap-4">
                        <Image
                            src={profile}
                            alt="Me!"
                            className="w-24 rounded border-4 border-stone-900 dark:border-stone-50"
                        />
                        <div className="h-fit grow">
                            <p className="m-0 font-bold">
                                By Omari Thompson-Edwards
                            </p>
                            <p className="m-0">Published: 17 November 2022</p>
                        </div>
                    </div>
                    <p>
                        TypeScript 4.9 beta is introducing a new operator, the
                        “satisfies” operator. The short version is that this
                        operator lets you ensure a variable matches a type,
                        while keeping the most specific version of that type.
                        You can check out the discussion on the feature here,
                        but in this article, I’ll talk you through how to use
                        it, and why it exists.
                    </p>
                    <div className="flex grow items-center justify-center text-6xl font-bold">
                        {theme === 'dark' ? <FaMoon /> : <FaSun />}
                    </div>
                </div>
            </main>
        </div>
    );
}
I’m using some styling from TailwindCSS here, which lets you enable and disable dark mode through a class. Then any classes with the “dark:” prefix get enabled with dark mode. This makes creating a dark mode really simple since Tailwind handles enabling/disabling all the classes. We can also do this in our code, I’ve done some conditional rendering to display the icon for our current theme at the bottom.
You can see the full code for the toggle switch on the GitHub page for this project, but here are the important snippets:
function toggleTheme(theme: Theme): Theme {
    if (theme === 'dark') return 'light';
    return 'dark';
}

export function DarkModeToggle({ className }: { className?: string }) {
    const darkMode = useDarkModeContext();
    const setStoredMode = useSetDarkModeContext();
...
            onClick={() => {
                setStoredMode(toggleTheme(darkMode));
            }}
...
{
I have a quick helper function to get the opposite theme. Then inside our component, whenever the toggle gets clicked, we call setStoredMode with the opposite theme. Whenever setStoredMode gets
Now let’s see this in action:
I can toggle our switch and the theme gets changed straight away. When I refresh the page, our hook loads the saved value, and starts with that theme.
And we can see our value in Local Storage:
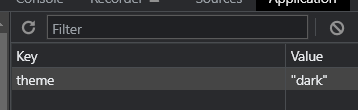
And that’s it! our state value stays in sync with Local Storage, we can refresh the page and our state value gets initialised with the stored value.
Thanks for reading, feel free to use the code from this article and adapt it to your own use case. If you liked this article, or if you’re having any issues, leave a comment below!
💬 Leave a comment