
In traditional HTML forms, the information is sent to the server when a submit button is clicked. However, modern websites often benefit from a more seamless experience.
Checkboxes are an example of an element that would traditionally be included as part of a form. In this tutorial, we’ll learn how to utilize React Checkboxes onChange event handler to call functions without explicitly pressing submit.
Below is a simple example of a React checkbox using the onChange event handler:
/* Create a checkbox functional component. onChange, log a message to the console. */

function Checkbox() {

  const handleChange = () => {

    console.log('The checkbox was toggled');

  };

  return (

    <div>  <input type="checkbox" onChange={handleChange}> </div>

  );

};

export {Checkbox};
The example above will log a message to the console when the checkbox is toggled.
The above code is great for when we just want to use the onChange event by itself. However, if we want to actually get the value of the checkbox (toggled or not), we have to add some more code.
Using setState with React Checkbox onChange
In React, the best way to do this is via the useState hook. This is different from normal JavaScript because we are unable to access the value of the checkbox directly from its DOM component:
/*
Create a checkbox functional component.
Toggle the text of a paragraph with the checkbox using the 'useState' hook.
*/

import React, {useState} from 'react';

function Checkbox() {

  const [checked, setChecked] = useState(false);
  const handleChange = () => {

    setChecked(!checked);

  };

  return (

    <div>


      <p>
        {checked ? 'Checked' : 'Not checked'}
      </p>

    </div>

  );

};

export default Checkbox;
Let’s walk through the above code.
First, we are importing the useState hook.
Next, we are creating our Checkbox component, which will toggle the text of a paragraph via the onChange event, which is bound to the checkbox. The setChecked method is used to change the state of the checked variable.
Finally, we return the checkbox, which can be toggled on and off to change the text within the paragraph.
The above example toggles text within a paragraph when the checkbox is checked and unchecked.
The checkbox only has two states. When we check it, we know that we want the paragraph’s text to switch to the one not currently in use.
Now, we will use information from the event to perform more complex operations.
Using Multiple Checkboxes
The below code will utilize a combination of a few different checkboxes to deliver a result to the user.
We’ll first rewrite the component we just created to use props to determine what values to use for the on and off states of the checkbox. This will allow us to modularize the component.
/* Rewrite the above component to use props instead. */

import React, {useState} from 'react';

function Checkbox(props) {

  const [checked, setChecked] = useState(false);
  const checkedText = props.onText;
  const uncheckedText = props.offText;
  const togglePreference = props.togglePreference;
  const animal = props.animal;

  const handleChange = () => {

    setChecked(!checked); togglePreference(animal);

  };

  return (

    <div>


      <p>
        {checked ? checkedText : uncheckedText}
      </p>

    </div>

  );

};


export {Checkbox};
Using props to determine the text that gets displayed when the checkbox gets toggled allows us to create many different checkboxes with minimal effort.
In addition to using props for our display text, we use props to take in a callback which we will use to compile all the checkboxes data. It’ll make more sense when we have the code in App.js.
Using Children Checkboxes to Change Parent Variables
With our checkbox component defined, we’ll now create multiple checkboxes, using their values to set a variable in the parent element. In doing so, we will demonstrate how multiple buttons can be used together in an application.
In App.js:
import { useState } from 'react';
import { Checkbox } from './Checkbox.js';

function App() {

  const [likings, setLikings] = useState("")
  const [preferences, setPreferences] = useState( { 'cats': false, 'dogs': false, 'pigs': false } )

  function togglePreference(animal) {

    preferences[animal] = !preferences[animal];

    // Update animal likings
    let newLikings = "";
    for ( var animal in preferences ) {

      if ( preferences[animal] ) {

        newLikings += animal + " ";

      }

    }

    setLikings(newLikings);

  }

  return (

    <div>

      <Checkbox onText="You are a cats person" offText="You are not a cats person" togglePreference={togglePreference} animal="cats" />
      <Checkbox onText="You like dogs" offText="You don't like dogs" togglePreference={togglePreference} animal="dogs" />
      <Checkbox onText="Pigs make you happy" offText="Pigs don't make you happy" togglePreference={togglePreference} animal="pigs" />

      <h1> My analysis of you: You like {likings} </h1>

    </div>

  )

}

export default App;
There’s a lot to unpack here! We first use useState to set two state variables, likings and preferences. We set likings to an empty string and preferences to an object setting all the animal types to ‘false’.
Then we define the togglePreference function. This function takes an animal type and sets preferences to either true or false for that animal type. Then it updates the state of the likings state variable to match the preferences state variable.
We do this so that we can pass togglePreference into our Checkbox components as a callback. On its own, our Checkbox component has no way to access its parent element, so we have to explicitly pass in the callback to allow it to change our likings string.
We then return three different checkboxes, each with a unique variable to set within our preferences object.
Let’s go over Checkbox.js one more time to make sure that the part with the callback makes sense. We’ll take a look at only the function itself:
function Checkbox(props) {

  const [checked, setChecked] = useState(false);
  const checkedText = props.onText;
  const uncheckedText = props.offText;
  const togglePreference = props.togglePreference;
  const animal = props.animal;
  const handleChange = () => {

    setChecked(!checked);
    togglePreference(animal);

  };

  return (

    <div>


      <p>
        {checked ? checkedText : uncheckedText}
      </p>

    </div>

  );

};
Pay attention to the togglePreference variable that we set to props.togglePreference. From our code in App.js, we know that this variable is being set to a function held by the parent element.
With this callback, the checkbox component can modify variables in the parent element despite having no other connection with it. Thus, in the function handleChange, we call the togglePreference function on the checkbox’s animal, modifying the preferences variable in the parent element.
We see the result below:
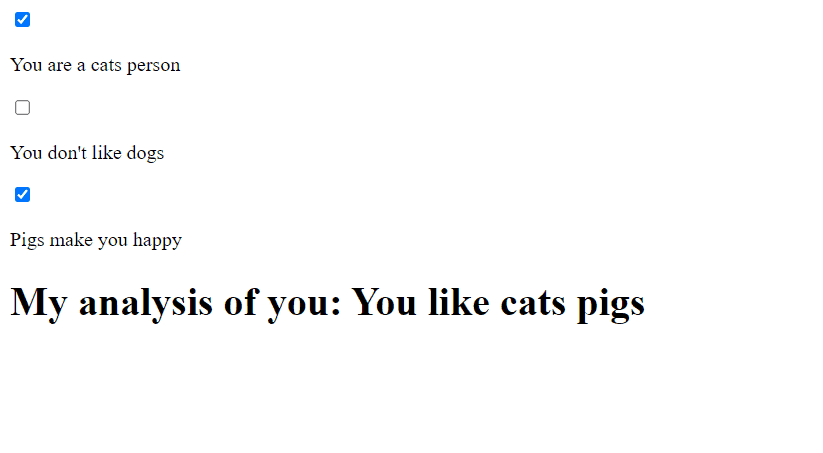
As we can see, the child elements are able to set the contents rendered by the parent.
That’s it for React Checkbox onChange! Please leave any questions or comments below.
💬 Leave a comment