localStorage is a web storage object in JavaScript that allows users to save data as key-value pairs.
JavaScript has two built-in properties to store data in your browser for later usage.
- sessionStorage: data gets lost if you close the page.
- localStorage: data has no expiration time.
localStorage is often used to add dark mode to applications or to save a to-do item in To-do lists apps and there are a bunch of other use cases.
In this tutorial, we will look at how you can use localStorage in React with help of React hooks.
Project setup
Get started by creating react app on your machine or simply open your browser and visit react.new (a new CodeSandbox environment will open with React project setup.). Thank me later 🙂
Using localStorage
Let’s start by creating a localStorage object. Open the App.js file in your react app and type the following code:
import React from "react";

function App() {
  const Data = () => {
    localStorage.setItem("Name", JSON.stringify("Pratham"));
  };

  return (
    <div>
      <button>Save Data</button>
    </div>
  );
}

export default App;
In this case, we have created an object inside the Data function with the setItem method which is used to add a key (Name) and value (Pratham) to the localStorage object.
Note: Using JSON.stringify is completely optional if your value is a string but you have to use it if your value will be an array or object
Just like the setItem method localStorage object consists of five main methods.
- setItem(): used to add data to localStorage
- getItem(): used to get data from localStorage
- removeItem(): used to remove data from localStorage
- clear(): used to delete all the data from localStorage
- key(): returns the name of the key from the Storage object.
Now that we have created a localStorage object, let’s see how to view the saved data in your browser. Make sure you’re running your react app.
In your browser open developer tools or simply right-click and hit inspect.
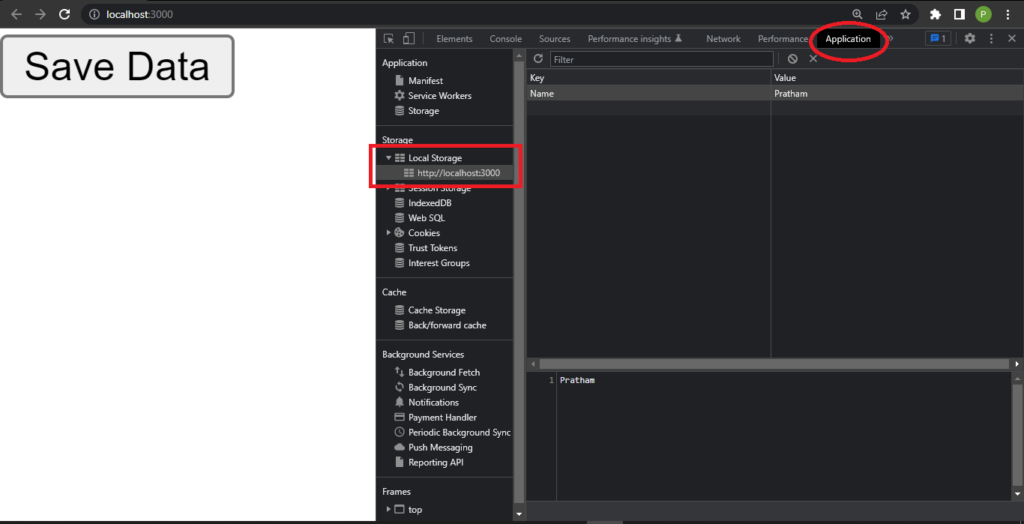
Next, click on Application on top and Local Storage as shown above.
Now, you can see the object we created earlier with key: Name and value: Pratham.
Using local storage with React hooks
For best practice, try to use the setItem method inside of the useEffect hook:
import React, { useEffect, useState } from "react";

function App() {
  const [name, setName] = useState([]);

  useEffect(() => {
    setName("Pratham");
    localStorage.setItem("name", JSON.stringify(name));
  }, [name]);

  return (
    <div>
      <p>{name}</p>
    </div>
  );
}

export default App;
Using stored data
To access our locally stored data we need to use the getItem() method. As mentioned earlier, the getItem method is used to retrieve data from local storage.
Let’s see that in work:
useEffect(() => {
    const name = JSON.parse(localStorage.getItem("name"));
    if (name) {
      setName(name);
    }
  }, []);
Now, if you have noticed we are using JSON.parse to convert data back to its original form because earlier we used JSON.stringify method to store our data.
We can delete our data from local storage with the removeItem() method.
localStorage.removeItem("name)Creating custom React hook
We can also create our custom hook that can be used anywhere in our application and which handles local storage in React apps.
import React, { useEffect, useState } from "react";

const useLocalStorage = (key, defaultValue) => {
  const [value, setValue] = useState(
    JSON.parse(localStorage.getItem(key, defaultValue))
  );

  useEffect(() => {
    localStorage.setItem(key, JSON.stringify(value));
  }, [value, key]);

  return [value, setValue];
};

export default useLocalStorage;
We can now use this custom hook in any React component just make sure we have a unique key in every component or the storage will collide with other components.
Conclusion
A lot can be done with localStorage and React hooks. In this tutorial, we learned how to use localStorage to store data and retrieve data with the help of React hooks. Later we also learned about how to create a custom local storage hook so that we can use it in more than one React component.
Thank you so much for reading this tutorial. I hope you understood everything that was explained in the tutorial.
Feel free to comment if you have any questions or If you have any suggestions. If you want to request any article for a particular topic contact through the about page. I would love to hear from you.
💬 Leave a comment