Table of Contents
- What are React Hooks?
- Why React Hooks?
- Installing React Hooks
- Using the State Hook
- Using the Effect Hook
- Wrapping Up
What are React Hooks?
React Hooks are a newly proposed feature that lets you use state and life-cycle methods without writing a class component.
React Hooks were released as part of React 16.8. If you’d like to learn more about Hooks, we’ve written two tutorials on how to use them:
React Hooks allow us to take Stateless Functional Components and apply state and lifecycle methods to them. As a result, this makes Class Components redundant. However, Class Components can still be used as 16.8 is backward compatible.
Hooks cannot be used inside Class Components, however.
Why React Hooks?
There are two types of React components: Class Components and Stateless Functional Components. The differences between the two are:
- Class components have a state and provide access to lifecycle methods like componentDidMount and componentDidUpdate.
- Stateless functional components are pure functions that do not have a state or lifecycle methods. They take in props and return HTML.
Lifecycle methods in class components could contain a mix of unrelated logic. For instance, additional setup for that component or making API calls to fetch data.
It is also harder to share logic between class components without using design patterns and implementations like render props and higher-order components.
As a result, class components are harder to understand, more complex, and require more time and effort to maintain. Hence, the need for a simpler implementation.
Installing React Hooks
To use React Hooks, you need to either upgrade the version of React and React-DOM to ‘16.8.2’, or create a new React project using Create React App.
In this tutorial, we’ll use Create React App to spin up a new React project.
Open your terminal and run the following to create the new project:
npx create-react-app hooks-demo
cd hooks-demo
npm start
If you’re upgrading an older version of React, open up the new hooks-demo project in your favorite text editor, and navigate to package.json Find and replace the ‘dependencies’ object with the lines below:
"dependencies": {
  "react": "16.8.2",
  "react-dom": "16.8.2",
}
If you’re using Atom, take a look at my best Atom packages for front end developers.
Jump back to your terminal and run
Great! Make sure the project still works, and if all looks good we’ll get into writing our first hook.
Using the State Hook
We’ll begin by creating a very, very simple Stateless Functional Component. Begin by opening up App.js and replacing the entire file with the code below:
import React from 'react';
import './App.css';

const App = () => {
  return (
    <div className="App">
      <h1>Hello, World!</h1>
    </div>
  );
}

export default App;
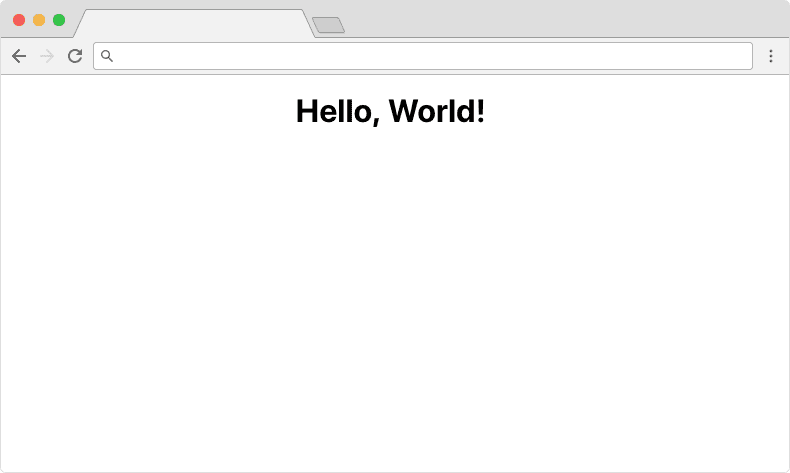
Twelve lines to create the world’s simplest React component! Save your file and jump over to the running app in your browser. You should see something like this:
Now that we have a simple React component, let’s use the useState React Hook to add some
import React, { useState } from 'react';
import './App.css';
const App = () => {
const [name, setName] = useState('World');
return (
<div className="App">
<h1>Hello, {name}!</h1>
<button onClick={() => setName('James')}>
Click me to change the name
</button>
</div>
);
}
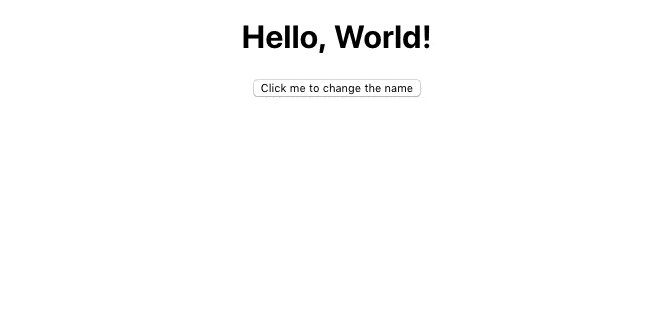
export default App;Let’s break down the code above to explain what we’ve added and how it works.
- Importing the useState hook from React.
- Creating a new constant that returns a pair of objects: name and setName from useState.
- Initializing the useState hook with a value of ‘World’.
- Using the ‘name’ state property by inserting it after ‘Hello’, {name}.
- Adding a button with an onClick handler that calls the setName function of useState with the value, ‘James’.
Clicking the button changes the name property in the state from ‘World’ to ‘James’. Save your file and try it out!
As always, experiment with the code before moving on so you fully understand what we’ve accomplished.
Using the Effect Hook
If you’ve written React class components before, you should be familiar with lifecycle methods like componentDidMount, componentDidUpdate, and componentWillUnmount.
The useEffect Hook is all three of these lifecycle methods combined.
Open up App.js and import useEffect at the top of the file.
import React, { useState, useEffect } from 'react';

...
Now that we’ve imported the useEffect React Hook, we can use it anywhere in our functional component, like so:
...
const App = () => {
const [name, setName] = useState('World');
useEffect(() => {
document.title = `Hello, ${name}`;
});
return (
<div className="App">
<h1>Hello, {name}!</h1>
<button onClick={() => setName('James')}>
Click me to change the name
</button>
</div>
);
}
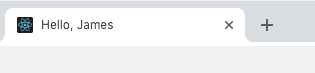
...Save the file and open up your running React app. Look at the browser tab, it should say ‘Hello, World’. Click the button and watch it change to ‘Hello, name’.
Other React Hooks
Check out the tutorials of other hooks:
With that, here are a few advanced tutorials:
- Form validation using custom React hooks
- Infinite scroll
- Modal components
- React timer component
- Build a Todo App
Wrapping Up
So there you have it, a quick introduction to React Hooks. As always, leave a comment if you liked the post or if you have a question.
Thanks for reading!
💬 Leave a comment