React-Query has recently emerged as one of the best tools a React developer could have in their arsenal. Gone are the days when you had nested functions to make API calls from components to fetch data from the server, handle the timing of those calls with the help of side effects (the useEffect hook) and write long and verbose redux actions and reducers just so the value could be stored in a global state (yes, React-Query can replace Redux).
If this was not enough to impress you, React-Query does all of these things with just a few lines of code.
To let you focus more on developing your product rather than engaging in the repetitive parts of software development, it takes care of the following for you.
- Fetching the data from the server when required.
- Caching the data so that your web apps are performant and super fast.
- Storing your API results in a global state (bye-bye Redux).
- Makes handling the side effects of an API call a breeze (the success and failure of it).
If you are not aware of how you can do that, don’t worry, you will see all of these points in action here today.
Now that I have got you excited about React-Query, let’s get started!
What we will build

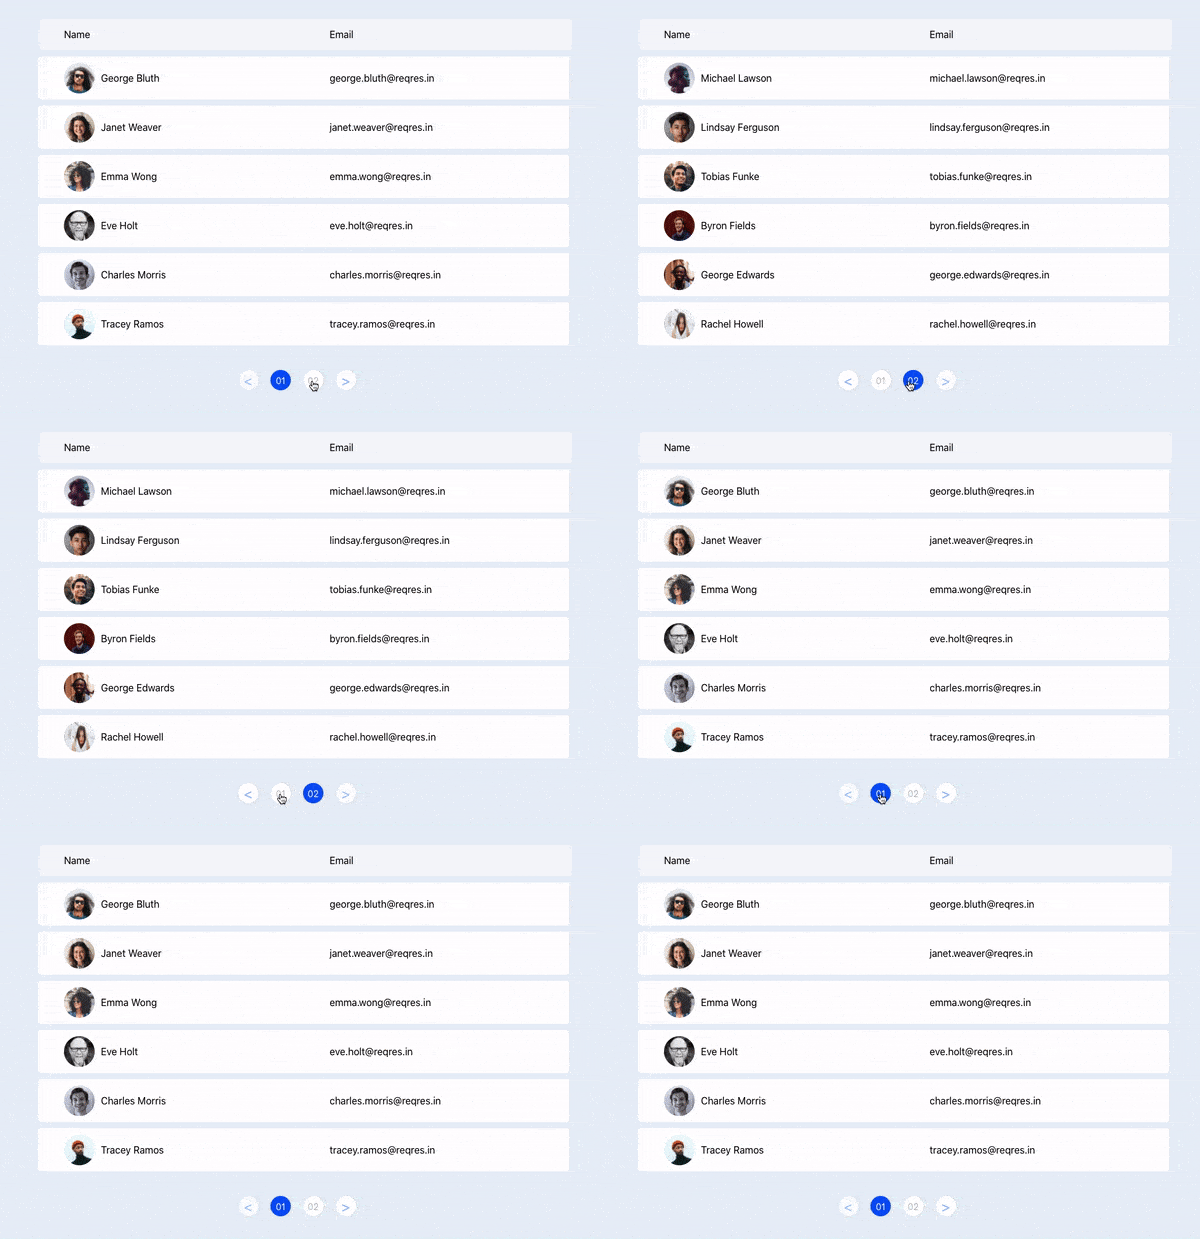
We will be building a list of paginated users. We will use this open to all API “https://reqres.in/api/users?page=1” which will provide us the list of users according to the page number we have requested.
Prerequisites:
Basic knowledge of React.
Things we will cover in this tutorial
- Basic Setup & Components
- Setup React-Query and React-Query Devtools
- Use React-Query to fetch our users from the API
- Pagination
Let’s get started!
I have a Github repository for you in case you want to skip the “Basic Setup and Components” part and jump right into action to the React-Query part.
https://github.com/upmostly/react-query-pagination
You can clone this repository in case you want to skip Part 1 of this tutorial.
After the Basic Setup your project will look something like this.
Part 1: Basic Setup & Components
Step 1: Initialize a react repository with the name “react-query-pagination”.
npx create-react-app react-query-paginationStep 2: Create “TableHeader” Component
Create a src/components/tableHeader folder.
Inside that folder create two files namely TableHeader.jsx and TableHeader.css
src/components/tableHeader/TableHeader.jsx
import './TableHeader.css';

const TableHeader = () => {
 return (
   <div className='table-header' >
     <span>Name</span>
     <span>Email</span>
   </div>
 );
};

export default TableHeader;
src/components/tableHeader/TableHeader.css
body {
 background-color: #e7eff8;
}

.table-header {
 background-color: #f5f7fb;
 height: 50px;
 width: 60%;
 margin-left: 50%;
 transform: translateX(-50%);
 margin-top: 50px;
 border-radius: 5px;
 border: 1px solid #ecf2f7;
 display: flex;
 align-items: center;
}

.table-header > span {
 width: 50%;
 padding-left: 5%;
}
Step 3: Create a “TableRow” Component
Create a src/components/tableRow folder.
Inside that folder create two files namely TableRow.jsx and TableRow.css
src/components/tableRow/TableRow.jsx
import "./TableRow.css";

const TableRow = () => {
 return (
   <div className="table-row">
     <span>
       <img
         src="https://randomuser.me/api/portraits/men/88.jpg"
         alt="avatar"
       />
       <span>Lukas Graham</span>
     </span>
     <span>emailid@gmail.com</span>
   </div>
 );
};

export default TableRow;
src/components/tableRow/TableRow.css
.table-row {
 background-color: white;
 width: 60%;
 margin-left: 50%;
 transform: translateX(-50%);
 margin-top: 10px;
 border-radius: 5px;
 display: flex;
 align-items: center;
}

.table-row > span {
 display: flex;
 align-items: center;
 width: 50%;
 padding-left: 5%;
 padding-top: 10px;
 padding-bottom: 10px;
}

.table-row > span > img {
 width: 50px;
 height: 50px;
 border-radius: 50%;
 margin-right: 10px;
}
Step 4: Create a “Pagination” Component
Create a src/components/pagination folder.
Let’s create a CSS file first in this case. So, we can talk about the functionality a bit on this component next.
src/components/pagination/Pagination.css
.pagination {
 display: flex;
 justify-content: center;
 margin-top: 40px;
}

.pagination div {
 width: 33px;
 height: 33px;
 background: white;
 box-shadow: 0px 0px 4px rgba(0, 0, 0, 0.15);
 border-radius: 50%;
 font-size: 15px;
 display: flex;
 justify-content: center;
 align-items: center;
 color: #bdbdbd;
 margin-right: 20px;
 cursor: pointer;
}

.pagination div.active {
 background-color: #0555fe;
 color: white;
}

.pagination div.pagination-arrow {
 font-size: 24px;
 color: #91b4f9;
}

.pagination div.pagination-arrow.inactive {
 opacity: 0.7;
 cursor: not-allowed;
}
Now, coming to the “Pagination” JSX component.
src/components/pagination/Pagination.jsx
import React from "react";
import PropTypes from "prop-types";
import "./Pagination.css";

const Pagination = ({ activePage, pages, setActivePage }) => {
  return (
   <div className="pagination">
     <div
       // Previous page (<) inactive if current page is 1
       className={`pagination-arrow ${activePage === 1 ? "inactive" : ""}`}
       onClick={() => activePage !== 1 && setActivePage((page) => page - 1)}
     >
       {"<"}
     </div>

     {getPages()} {/* We will handle this method in the next step */}

     <div
       // Next Page (>) inactive if the current page is the last page.
       className={`pagination-arrow ${activePage === pages ? "inactive" : ""}`}
       onClick={() =>
         activePage !== pages && setActivePage((page) => page + 1)
       }
     >
       {">"}{" "}
     </div>
   </div>
 );
};

// activePage, setActivePage and pages will be passed down as props

Pagination.propTypes = {
 activePage: PropTypes.number,
 pages: PropTypes.number,
 setActivePage: PropTypes.func,
};

export default Pagination;
Now we will add the “getPages” function to the Pagination Component.
 // Methods
 const getPages = () => {
   const elements = [];
   for (let i = 1; i <= pages; i++) {
     elements.push(
       <div
         className={`${activePage === i ? "active" : ""}`}
         onClick={() => setActivePage(i)}
         key={i}
       >
         {i < 10 ? `0${i}` : i}
       </div>
     );
   }
   return elements; // [<div>1</div>, <div>2</div>....]
 };
Step 5: Call all these Components in the “App.js” file.
src/App.js
import { useState } from "react";
import TableHeader from "./components/tableHeader/TableHeader";
import TableRow from "./components/tableRow/TableRow";
import Pagination from "./components/pagination/Pagination";

const App = () => {
 // States
 const [activePage, setActivePage] = useState(1);

 return (
   <>
     <TableHeader />
     <TableRow />
     <Pagination
       activePage={activePage}
       setActivePage={setActivePage}
       pages={2} // Total number of pages
     />
   </>
 );
};

export default App;
We have the basic components now so our list looks something like this.

Part 2: Setup React Query and React Query Devtools
You can skip this part in case you are already familiar with the setup of React-Query
Step 1: install react-query and axios (data fetching library)
npm install react-query axiosStep 2: Setup React-Query
In your src/index.js file
import React from "react";
import ReactDOM from "react-dom";
// React Query Essentials
import { QueryClient, QueryClientProvider } from "react-query";

// Devtools to monitor our data fetched
import { ReactQueryDevtools } from "react-query/devtools";
import App from "./App";

// React Query Config
const queryClient = new QueryClient(); // Global Store Instance

ReactDOM.render(
 // Provide access to Global Store
 <QueryClientProvider client={queryClient}>
   <React.StrictMode>
     <App />
   </React.StrictMode>

   {/* DevTools Setup */}
   <ReactQueryDevtools initialIsOpen={false} />
 </QueryClientProvider>,
 document.getElementById("root")
);
We can see that our devtools have been setup when this nice little logo appears at the bottom left of our page. Clicking on it however would just reveal a blank canvas as we don’t have any data fetched through the library.

Part 3: Use React-Query to fetch our users from the API.
Step 1: Create a “useUsers” hook to fetch our users from the api.
Create a src/hooks/users.js file. Add the following lines of code in the file.
src/hooks/users.js
import { useQuery } from "react-query";
import axios from "axios";

export const useUsers = () => {
 return useQuery("users", async () => {
   const { data } = await axios.get("https://reqres.in/api/users?page=1");

   return data;
 });
};
Step 2: Import this hook in “App.js”.
src/App.js
import { useState } from "react";
import TableHeader from "./components/tableHeader/TableHeader";
import TableRow from "./components/tableRow/TableRow";
import Pagination from "./components/pagination/Pagination";
// Import the hook
import { useUsers } from "./hooks/users";

const App = () => {
 const [activePage, setActivePage] = useState(1);

 // React Query takes care of calling
 // userUsers hook when App.js is rendered.
 const usersList = useUsers();

 return (
   <>
     <TableHeader />
     {/* map through users list */}
     {usersList.data &&
       usersList.data.data.map((user) => <TableRow user={user} />)}
     <Pagination
       activePage={activePage}
       setActivePage={setActivePage}
       pages={2}
     />
   </>
 );
};

export default App;
We can see the fetched users in the devtools.

Step 4: Connect the “TableRow” component to our data fetched
In case you are not familiar with React’s state management and props, check out this beginner’s tutorial which will help you in this.
After completing Step 4, we now have our list of users without the pagination. It should be looking something like this.
Part 4: Pagination
Now we will add Pagination to the component by changing just 4 lines of code.
Step 1. Pass “activePage” state to our useUsers hooks
In src/App.js, change the “usersList” variable to:-
const usersList = useUsers(activePage);Step 2: Change the “useUsers” hook to allow Pagination
// Accept activePage as a parameter from App.js
export const useUsers = (activePage) => {
 return useQuery(
   // Add activePage as a dependency
   ["users", activePage],
   async () => {
     const { data } = await axios.get(
       // Change page number to the activePage param received
       `https://reqres.in/api/users?page=${activePage}`
     );

     return data;
   },
   // This tells React-Query that this is Query is part of
   // a paginated component
   { keepPreviousData: true }
 );
};
Let’s take a look at 2 lines in particular to see why we did that
useQuery(["users", activePage], () => {})We changed the query from a string to an array to accommodate “activePage” as a dependency.
Doing so, will tell React-Query to call the “users” query again in case the “activePage” is changed (similar to useEffect hook right?).
{ keepPreviousData: true }We added this line in our useQuery hook in order to tell React-Query that this query is part of a paginated component. React-Query would then take care to not remove the cached data for each page for a super fast response time in case of a page change.
Enough said, let’s review how these changes will get reflected in our application as well as the devtools.

We can see that the Pagination is working flawlessly. The load times are super quick as well because of caching.
Let’s see how the our global state has changed in the devtools.

We can see that our data is stored in two keys now, namely:-
- “[‘users’, 1]” for the data of users for the first page.
- “[‘users’, 2]” for the data of users for the second page.
Voila! Now you know how to build a pagination component with React-Query. Our web-app looks super fast with a lot less lines of code than usual, thanks to React-Query.
Let us know in the comments if you found this helpful so that we remain motivated to keep making such interesting and useful content.
💬 Leave a comment